![]()
Set one original at a time on the original table.
Do not load multiple originals concurrently in parallel.
If the original's rear edge is badly curled, smooth it out with both hands before scanning. If the original is inserted as is, it may be damaged.
If the original is curled at its leading edge, straighten it out before loading it.
When inserting an original, push it lightly against the rollers. Pushing it with force may cause an original jam.
When inserting an original, be careful not to put the trailing edge into the entrance of the bypass tray. This will cause an original jam.
To copy a rolled long original, hold it in your hands or place it on the original table instead of placing it on the machine's front output tray.
When you load an original which is 2 m (78.7 inches) or longer, be sure to rub and load it.
If the side of the original protrudes 480 mm (18.9 inches) away from the center (dashed line on the original table), stop printing.
Be sure not to place anything other than originals on the original table.
Be sure not to place anything weighing 5 kg or more on the original table. Make sure no one climbs, sits, leans on or hangs from it.
Load a thick or long by pushing it in lightly. Do not prevent the original from being fed.
Load the original only after the machine is ready.
You can load a rolled original 40 to 110 mm in diameter.
When scanning a rolled original, straighten it out to its end by hand when you load it.
If the copy is severely curled at its end or is charged with static electricity, remove the curl one by one by hand and place it on the original table.
If misregistration occurs when a thick original or an original longer than A1
 is fed, load the original along the line on the original table without using the side guides.
If you continuously copy 50 or more sheets of paper with a width of A1
 or below, uneven printing may occur in the solid-filled area (2 mm or wider) at the trailing edge. If this happens, leave the machine idle for a while and try copying again.
When you load an original, load it with the side to be scanned face down and the right edge aligned with the side guide.
Do not open the scanner cover until the original is completely delivered.
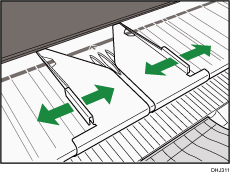
![]() Adjust the original guides to the size and orientation of the original.
Adjust the original guides to the size and orientation of the original.
Make sure the original guides are flush against the original. Do not push the original guide side fence with force.

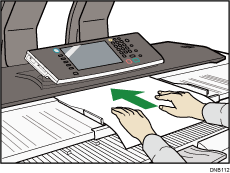
![]() Using both hands, carefully insert the original between the original guides, copy side down.
Using both hands, carefully insert the original between the original guides, copy side down.
Holding the original with both hands, push it in until it stops. When the machine starts pulling in the original, remove your hands.

![]()
After inserting an original, do not try to handle it. Support it, if necessary, so as not to interrupt feeding.
If there is a solid-filled area on the leading edge, adjust settings to leave a margin at the leading edge.
An image with a solid-filled area at the leading edge may show separation pawl traces. If you continuously copy a pattern with many images and then copy a solid-fill, the copy may be show separation pawl traces. If this happens, copy with a margin of 60 mm (2.4 inches) or more on the leading edge.
If you scan an original with a relatively dark background and the background appears on the copy, adjust the auto density setting to a lighter level along the notch.
If the machine stops scanning due to an original feeding error, press the [Scanner Stop] key to stop feeding the original, open the scanner cover, and then remove the original. During this, do not turn off the power switch.
