This section explains the [Reduce / Enlarge] settings of the [Edit] tab in [Scan Settings].
When scanning a bundle of mixed size originals, you can unify the size of the scanned data by using [Specify Size].
Entering values in the Reduce / Enlarge configuration screen
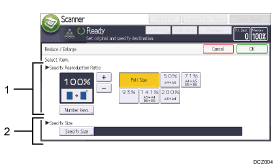
Specify Reproduction Ratio
Enter a value for the reproduction ratio.
To make a small adjustment to the reproduction ratio value, press [
 ] or [
 ].
].To make a large change to the value, enter the desired value using [Number keys], and then press [
 ].
].To use a pre-defined reproduction ratio, press the desired ratio.
Specify Size
Specify the finished size of the scanned originals.
Press [Specify Size], and then specify the finished size of the scanned originals.
To select [Custom Size] for the finished size of the scanned originals, enter the value of [Short Edge] and [Long Edge] of the scan size using the number keys.
![]()
[High Compression PDF] cannot be selected if the [Reduce / Enlarge] function is used.
For details about how to edit the pre-defined reproduction ratio, see Scan Settings.
 (mainly North America)
[Reduce / Enlarge] cannot be specified if [LT/LG Mixed Sizes] is used.