Using the computer and the machine, print the format matching the size of the paper requiring image position adjustment.
![]() Continuously print the format on both sides of 10 sheets.
Continuously print the format on both sides of 10 sheets.
The format has arrows on 4 corners.
![]() Measure the length of specified parts on the 6th sheet among the printed copies of the format.
Measure the length of specified parts on the 6th sheet among the printed copies of the format.
Using the ruler and magnifier, measure the length between each corner of the paper and the top of its adjoining arrow, and the length between the top of arrows with the scale in 0.1 mm.
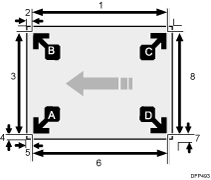
Length between the top of each arrow
Length between each corner and the top of its adjoining arrow
Length between the top of each arrow
Length between each corner and the top of its adjoining arrow
Length between each corner and the top of its adjoining arrow
Length between the top of each arrow
Length between each corner and the top of its adjoining arrow
Length between the top of each arrow
![]() Write the measured value within the framework of the format.
Write the measured value within the framework of the format.
In total (including both sides of the sheet), measure the position of 16 parts.
![]()
Depending on the paper size, when you print continuously, the feeding interval differs for each sheet of the first and last 3 to 4 sheets and the sheets in the middle (in the case of printing 10 sheets, the 5th and 6th sheets). Therefore, it is recommended to use the 6th sheet for measurement.
First, check that the arrow direction and paper feed direction on the printed sheet are correct. If they are incorrect, change the print setting.