![]()
|
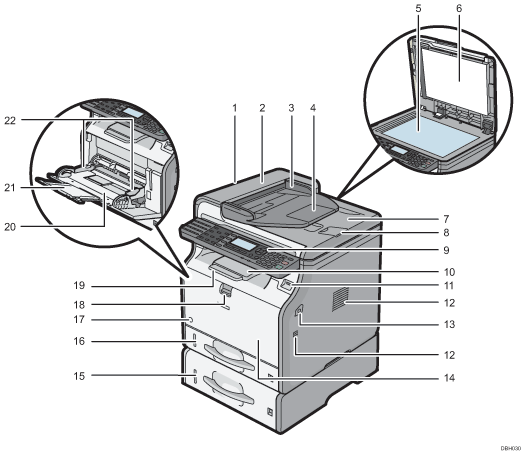
Exterior: Front view

ADF
Lower the ADF over originals placed on the exposure glass.
If you load a stack of originals in the ADF, the ADF will automatically feed the originals one by one.
ADF cover
Open this cover to remove originals jammed in the ADF.
Input tray for the ADF
Place stacks of originals here.
Extender for the ADF tray
Extend this when placing paper longer than A4 in the input tray for ADF.
Exposure glass
Place originals face down here.
Cover for the exposure glass
Open this cover to place originals on the exposure glass.
Output tray for the ADF
Originals scanned with the ADF are output here.
Stop fence for the ADF
Pull out this fence to prevent originals from falling off.
Control panel
See Guide to the Names and Functions of the Machine's Control Panel.
Standard tray
Copied/printed paper and fax messages are delivered here.
Media slot
Insert a USB flash memory device.
Ventilation holes
Prevent overheating.
Front cover open button
Push this button to open the front cover.
Front cover
Open to access the inside of the machine and remove jammed paper.
Open here to replace the toner cartridge and the drum unit.
Lower paper tray (option)
Load paper here.
Tray 1
Load paper here.
Main power switch
To operate the machine, the main power switch must be on. If it is off, turn the switch on.
Bypass tray open lever
Push this lever to open the bypass tray.
Tray Extension
Pull this fence to prevent paper from falling off.
Bypass tray
Use to copy or print on thick paper, OHP transparencies, envelopes, and label paper (adhesive labels).
Extender for the bypass tray
Pull this extender out when loading A4
 , 81/2 × 11
 or larger size paper in the bypass tray.
Paper guides
When loading paper in the bypass tray, align the paper guides flush against the paper.
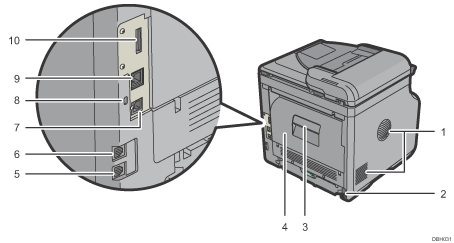
Exterior: Rear view

Ventilation holes
Prevent overheating.
Power connector
Connect the power cord to the machine. Insert the other end into an electrical outlet.
Rear cover open lever
Pull this lever to open the rear cover.
Rear cover
Open to access the inside of the machine and remove jammed paper.
Open here to replace the fusing unit.
External telephone connector
For connecting an external telephone.
Line interface connector
For connecting a telephone line.
USB 2.0 [Type B] port
Use a USB cable to connect the machine to a computer.
Security slot
Connect a security cable to prevent theft.
Ethernet port
Use a network interface cable to connect the machine to a network.
Slot
Optional wireless LAN interface unit can be inserted.
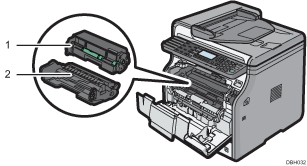
Interior: Front view

Toner cartridge
Pull out the toner cartridge and remove jammed paper.
Messages appear on the screen when the toner cartridge needs to be replaced, or a new cartridge needs to be prepared.
For details about the messages that appear on the screen when consumables need to be replaced, see "Replenishing and Replacing Consumables", Maintenance and Specifications.

When you remove jammed paper, pull out the toner cartridge with the drum unit. If you want to remove only the toner cartridge, pull down the lever on the right side of the toner cartridge, and then pull the toner cartridge out.
Drum unit
Messages appear on the screen when the drum unit needs to be replaced, or a new drum unit needs to be prepared.
For details about the messages that appear on the screen when consumables need to be replaced, see "Replenishing and Replacing Consumables", Maintenance and Specifications.
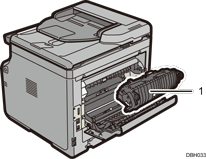
Interior: Rear view

Fusing unit
Pull out the fusing unit and remove jammed paper.
Messages appear on the screen when the fusing unit needs to be replaced, or a new fusing unit needs to be prepared.
For details about the messages that appear on the screen when consumables need to be replaced, see "Replenishing and Replacing Consumables", Maintenance and Specifications.
The fusing unit is included in Maintenance Kit.
