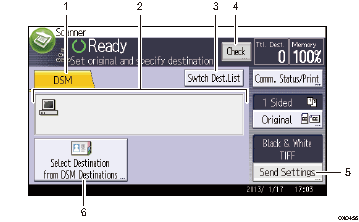
This section explains the layout of the screen that allows you to send scan files using DSM.

DSM
This tab is highlighted whenever the machine is used as a DSM scanner.
Destination field
The specified destination is displayed here. You can specify only one destination.
[Swtch Dest.List]
Press to switch to the [Email] screen, [Scan to Folder] screen, the [WSD scanner] screen, or the [Network Delivery Scanner] screen.
[Check]
Allows you to confirm the scanning settings.
[Send Settings]
Allows you to specify scan settings and original feed types.
[Select Destination from DSM Destinations]
Press to display the list of available destinations.
If all of the destinations cannot be displayed, press [
 ] or [
 ] to move through the list.
