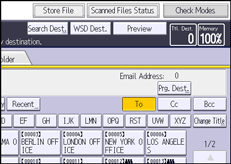
This section explains items that are displayed and how to display the [Scanned Files Status] screen.
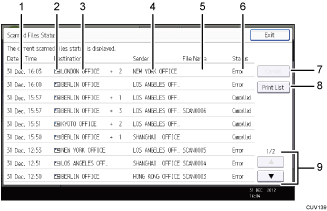
Use the [Scanned Files Status] screen to check e-mail transmission and Scan to Folder results.
Press [Scanned Files Status] to display the [Scanned Files Status] screen.

Up to nine transmission results are displayed at the same time. Press [![]() ] or [
] or [![]() ] to switch between results.
] to switch between results.
[Scanned Files Status] screen

Date / Time
Displays the time and date transmission was specified by this machine or the time and date when Completed, Error, or Cancelled was confirmed.
Transmission function icon
Displays the icon of the transmission function used.
The (
 ) symbol indicates a destination that can receive encrypted e-mail.
Destination
Displays the transmission destination.
If you have selected multiple destinations, the first selected destination is displayed.
Other destinations appear as "+ X" (X indicates the number of destinations.) when sending files by e-mail.
Sender
Displays the sender name.
File Name
Displays the stored file name of files that are simultaneously sent and stored, or of stored files that are sent.
Status
Displays one of the following transmission statuses: Completed, Trnsmtg., Waiting..., Error, or Cancelled.
[Cancel]
To cancel transmission, select a file whose status is "Waiting...", and then press [Cancel].
[Print List]
Press to print transmission results.
[
 ]/[
]/[ ]
]Press to scroll the screen.
![]()
You cannot check scanner function transmission results in the [Job History] screen. To check transmission results, press [Scanned Files Status].
Depending on security settings, some transmission results might not be displayed.
