Adjust Paper Feed
If horizontal lines are printed unaligned, print images are patchy, or black or white streaks are printed at regular intervals, print a test pattern, and then adjust the paper feed setting.
![]() Press the [User Tools] key.
Press the [User Tools] key.
![]() Press [Login].
Press [Login].
![]() Enter the login password, and then press the [OK] key.
Enter the login password, and then press the [OK] key.
![]() Press the [
Press the [![]() ] or [
] or [![]() ] key to display [Maintenance], and then press the [OK] key.
] key to display [Maintenance], and then press the [OK] key.
![]() Press the [
Press the [![]() ] or [
] or [![]() ] key to display [Adjust Paper Feed], and then press the [OK] key.
] key to display [Adjust Paper Feed], and then press the [OK] key.
![]() Press the [B&W Start] or [Color Start] key.
Press the [B&W Start] or [Color Start] key.
A test pattern to adjust paper feed is printed.
![]() Check the optimal adjustment values on the printed test pattern.
Check the optimal adjustment values on the printed test pattern.
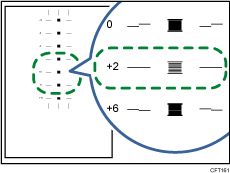
The optimal adjustment value is the number that appears on the left of the lightest gray square with straight horizontal lines on both sides. When this number is "+2", the optimal adjustment value is "+2".

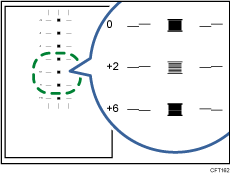
When horizontal lines beside the lightest gray square are broken, select the optimal adjustment value by referring to the lines broken in the opposite direction. When the "+2" square is the lightest gray square and the "+6" horizontal lines are broken in the opposite direction, the optimal adjustment value is between "+3" and "+5". After adjustment, check the adjustment result.

![]() Press [Adjust].
Press [Adjust].
![]() Enter the adjustment value (-14 to +14) from Step 7, and then press the [OK] key.
Enter the adjustment value (-14 to +14) from Step 7, and then press the [OK] key.
![]() Press [Exit].
Press [Exit].
![]() Press the [Escape] key.
Press the [Escape] key.
![]()
If black or white streaks still appear after the adjustment, keep adjusting the value by 1 and executing "Adjust".
If black streaks appear, increase the adjustment value.
If white streaks appear, decrease the adjustment value.
Keep adjusting the value and executing "Adjust" until the black or white streaks disappear.

