![]() Display the initial settings screen.
Display the initial settings screen.
When using the standard operation panel
Press the [User Tools/Counter] key.
When using the Smart Operation Panel
Press the [Home] key on the top left of the control panel. Flick the screen to the left, and then press the [User Tools] icon (
 ) on the Home screen 4.
![]() Press [Address Book Mangmnt].
Press [Address Book Mangmnt].
![]() Check that [Program / Change] is selected.
Check that [Program / Change] is selected.
![]() Select the name whose IP-Fax destination you want to register.
Select the name whose IP-Fax destination you want to register.
Press the name key, or enter the registered number using the number keys.
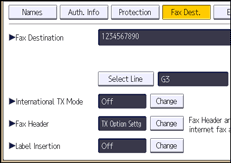
![]() Press [Fax Dest.].
Press [Fax Dest.].
![]() Press [Select Line], and then select [H.323] or [SIP].
Press [Select Line], and then select [H.323] or [SIP].

![]() Press [OK].
Press [OK].
![]() Press [Change] under "Fax Destination".
Press [Change] under "Fax Destination".
![]() Enter the IP-Fax destination.
Enter the IP-Fax destination.
![]() Press [OK].
Press [OK].
![]() Press [OK].
Press [OK].
![]() Press [Exit].
Press [Exit].
![]() Close the initial settings screen.
Close the initial settings screen.
When using the standard operation panel
Press the [User Tools/Counter] key.
When using the Smart Operation Panel
Press [User Tools/Counter] (
 ) on the top right of the screen.
![]()
To register the name, see Registering User Information.
For details on how to access System Settings, see Accessing User Tools.
When using the Smart Operation Panel, you can display the Address Book screen by pressing the [Address Book Management] icon on the Home screen 4.
