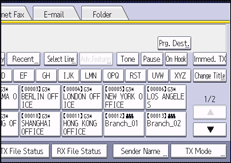
Select a user that you want to specify as a sender.
You can use the following functions if you specify a sender:
E-mail TX Results
If the sender's e-mail address is registered in the destination list, the sender can receive transmission results by e-mail.
Stamp Sender Name
The registered sender's name (user name) appears on the receiver's sheet, lists, and report.
If the sender is not registered in the Address Book, you must first register it. If you want senders to receive e-mail notification of transmission results, specify [Use Name as] for both [Sender] and [Destination]. For details, see "Registering Addresses and Users for Facsimile/Scanner Functions", Connecting the Machine/ System Settings.
![]() Press [Sender Name].
Press [Sender Name].

![]() Select a sender.
Select a sender.
To select a sender by specifying the registration number registered in the Address Book, press [Registration No.].
To search for a sender from the Address Book, press [Search].
If a destination protection code is set, the entry screen appears. Enter the protection code for destination using the number keys, and then press [OK].
![]() Confirm the selected sender, and then press [OK].
Confirm the selected sender, and then press [OK].
![]() To confirm the transmission results by e-mail notification, press [E-mail TX Results] to highlight it.
To confirm the transmission results by e-mail notification, press [E-mail TX Results] to highlight it.
![]() To print the sender's name on the receiver's sheet, press [Stamp Sender Name] to highlight it.
To print the sender's name on the receiver's sheet, press [Stamp Sender Name] to highlight it.
![]() Press [OK].
Press [OK].
![]()
If [Auto Specify Sender Name] is set to [On] in [System Settings], the sender is automatically specified and you can omit the procedure for specifying a sender. If [On] is selected, either the administrator's or this machine's e-mail address appears in the "From" field. For details about Auto Specify Sender Name, see "File Transfer", Connecting the Machine/ System Settings.
If user authentication is set, the user logged in is set as sender. The transmission result is sent to the logged-in user's e-mail address.
