Use the paper bypass location to copy onto paper sizes that cannot be loaded on the paper input location.
![]()
If the paper is curled, load it so that it curls facing downward.

When loading paper that is longer than A1 (D)
 , place a clean cloth or sheet of paper behind the machine in advance. If the edge of the paper touches the floor and get dirty, a malfunction might occur.
![]() Make sure that “Ready” appears on the screen.
Make sure that “Ready” appears on the screen.
![]() When the paper roll is loaded, press down the rewind button on the right of the paper input location for where the paper roll is loaded for more than one second.
When the paper roll is loaded, press down the rewind button on the right of the paper input location for where the paper roll is loaded for more than one second.
After you release the button, the paper is rewound automatically.
If the paper roll is not loaded, proceed to step 3.

![]() Open the front cover.
Open the front cover.
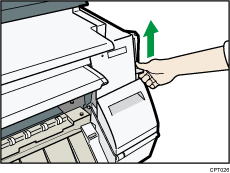
![]() Pull up the paper holding lever on the right of the machine.
Pull up the paper holding lever on the right of the machine.
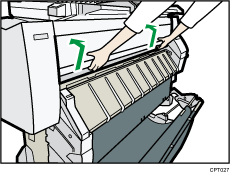
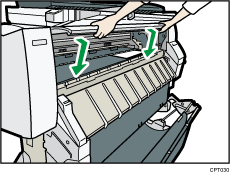
![]() Insert the paper face up under the rollers in the paper bypass location.
Insert the paper face up under the rollers in the paper bypass location.
Align the right corner of the paper to the paper set position on the paper bypass location.
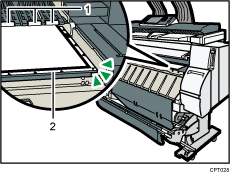
Rollers
Paper set position
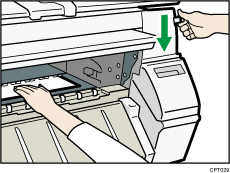
![]() Lower the paper holding lever to fix the paper position.
Lower the paper holding lever to fix the paper position.
When using paper that is longer than A2 (C)![]() , lower the paper holding lever while holding the paper with your hand.
, lower the paper holding lever while holding the paper with your hand.
![]() Close the front cover.
Close the front cover.
![]() Follow the on-screen instructions to specify the paper type and thickness of the paper.
Follow the on-screen instructions to specify the paper type and thickness of the paper.
Press [Matches] if the paper type and thickness of paper you loaded are the same as those displayed on the screen.
If the paper type and thickness are different from those displayed, press [Does not Match]. Select the proper items according to the paper type and thickness you want to use, and then press [OK].
![]() Make sure that [
Make sure that [![]() ] appears at the paper bypass location on the screen.
] appears at the paper bypass location on the screen.
![]()
Do not operate the machine while “Please wait.” is displayed when the machine is turned on.
Press the rewind button to rewind the roll of paper. Rewinding it manually may cause paper jams.
When [Film (Matted)] is specified for Paper Type or when Prevent Paper Abrasion is specified, press [Exit] on the screen after closing the front cover. You can change the Prevent Paper Abrasion setting in System Settings if necessary. However, if you specify [Film (Matted)] for Paper Type, the Prevent Paper Abrasion setting is automatically selected, and you cannot change it. For details about Prevent Paper Abrasion, see "System Settings", Connecting the Machine/ System Settings.
Do not print on both sides of the paper.
Do not use paper already printed on.
Do not insert multiple sheets at one time. Doing so can result in jams and poor quality prints.
If you are printing multiple pages, insert each additional sheet after the preceding sheet is fully ejected from the machine.
If you load paper that curls severely, the edge of the paper may be caught when it is fed into the paper bypass location. Flatten the curled paper with your hands before loading the paper.
If the edge of the roll paper is ejected from the machine, load it again after copying or printing from the paper bypass location. For details about how to load the paper roll, see Loading Paper into the Paper Input Location
 .
.You can specify the types of paper you load in the paper bypass location in advance. For details, see "System Settings", Connecting the Machine/ System Settings.
When copying from the paper bypass location, see "Copying from the Paper Bypass Location", Copy/ Document Server. When printing from a computer, see Printing from the Paper Bypass Location Using the Printer Function
.