This section describes how to connect an Ethernet cable to the Ethernet interface.
![]()
|
![]()
If the main power switch is on, turn it off.
Use the following Ethernet cables.
Unshielded Twisted Pair Cable (UTP) or Shielded Twisted Pair Cable (STP) and Category type 5 or more
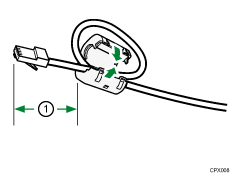
![]() Make a loop 3 cm (1.2 inches) (1) from the end of the Ethernet cable and attach the included ferrite core to the loop as shown.
Make a loop 3 cm (1.2 inches) (1) from the end of the Ethernet cable and attach the included ferrite core to the loop as shown.

![]() Make sure the main power is switched off.
Make sure the main power is switched off.
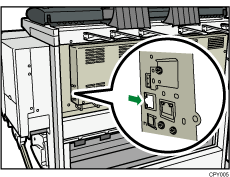
![]() Connect the Ethernet interface cable to the 10BASE-T/100BASE-TX port.
Connect the Ethernet interface cable to the 10BASE-T/100BASE-TX port.

![]() Connect the other end of the Ethernet interface cable to a network connection device such as a hub.
Connect the other end of the Ethernet interface cable to a network connection device such as a hub.
![]() Turn on the main power switch of the machine.
Turn on the main power switch of the machine.

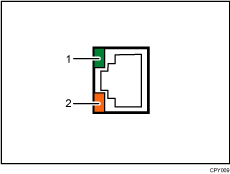
Indicator (green)
When 10BASE-T is operating, the LED is lit green. When 100BASE-TX is operating or the machine is not connected to the network, it is turned off.
Indicator (orange)
When 100BASE-TX is operating, the LED is lit orange. When 10BASE-T is operating or the machine is not connected to the network, it is turned off.
![]()
Use an Ethernet interface cable that supports "Ethernet Speed". If you select [Auto Select] for "Ethernet Speed", use an Ethernet interface cable that supports 100BASE-TX.
Check the cable plug type before connecting the cable.
You may not be able to connect the cable if you are using a cable plug type or cable interface converter that is not common.
Do not pull the cable forcefully when it is connected. To prevent cables from being accidentally pulled, arrange the cables connected to the computer so that nobody trips over them.
When you feed paper into the paper bypass, the paper is transferred to the rear side of the machine. Make sure that the cables are arranged not to interfere with the paper. If the cables are improperly arranged, a paper jam may occur in the paper bypass or the paper may get wrinkled.
For details about how to turn on the main power switch, see "Turning On the Main Power", Getting Started.
For details about installing the printer driver, see "Installing the Printer Driver", Driver Installation Guide.
