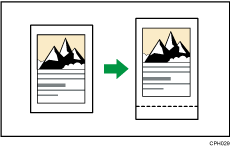
When [Synchro Cut] is selected, you can create a margin on the copy's leading and trailing edge.
![]()
You cannot use the paper bypass location with this function.
This function has the following two types:
Top Margin
Add a margin to the leading edge at the top of the copy.
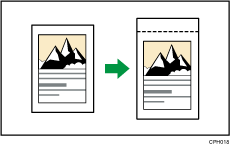
Bottom Margin
Add a margin to the trailing edge at the bottom of the copy.
![]() Press [Edit / Colour].
Press [Edit / Colour].
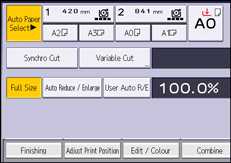
![]() Press [Margin Adj.].
Press [Margin Adj.].
![]() Press [Top Margin].
Press [Top Margin].
![]() Specify the margin using [
Specify the margin using [![]() ] or [
] or [![]() ].
].
![]() Press [Bottom Margin].
Press [Bottom Margin].
![]() Specify the margin using [
Specify the margin using [![]() ] or [
] or [![]() ], and then press [OK].
], and then press [OK].
[Synchro Cut] is automatically selected.
![]()
Pressing [
 ] or [
 ] changes the width in increments of 1 mm (0.1 inches). Pressing and holding down the relevant key changes the width in increments of 10 mm (1 inch).
You can specify the margin from 0 to 200 mm (0 to 7.9 inches).
You can specify both the top and the bottom margins at a time.
The length of a copy is a combined length of an original and its margins. The length of an original is automatically specified in the Synchro Cut mode.
If you specify the margin too long for the original, parts of the image might not be copied.
You can change the settings for Margin Adjustment under [Edit] in User Tools. For details, see Edit
 .
.