![]() Check the contents of the package.
Check the contents of the package.
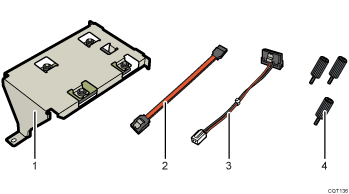
Hard disk
Flat cable
Power cord
Screws (3)
![]() Turn the printer off and unplug the power cord.
Turn the printer off and unplug the power cord.
![]() Remove the screws securing the controller board.
Remove the screws securing the controller board.
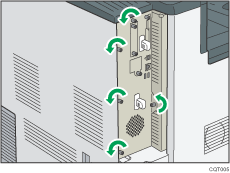
The removed screws will be used to secure the controller board again later.
![]() While holding the handle, carefully pull out the controller board.
While holding the handle, carefully pull out the controller board.
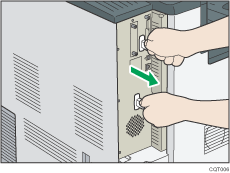
Slide the controller board completely out and place it on a flat surface such as a table.
![]() Install the hard disk in the indicated position.
Install the hard disk in the indicated position.
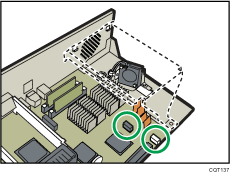
Install the hard disk carefully if the SDRAM module is already installed. If the hard disk comes in contact with the SDRAM module, the SDRAM module may become damaged.
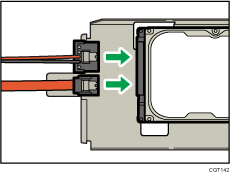
![]() Connect the flat cable and power cord to the hard disk.
Connect the flat cable and power cord to the hard disk.
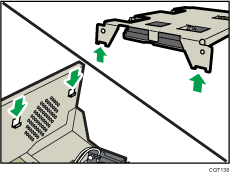
![]() Hook the mounting indents on the hard drive onto the tabs on the controller board panel.
Hook the mounting indents on the hard drive onto the tabs on the controller board panel.
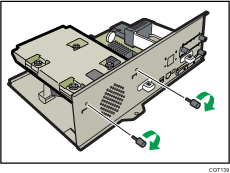
![]() Use two screws to fasten the hard disk to the controller board panel.
Use two screws to fasten the hard disk to the controller board panel.
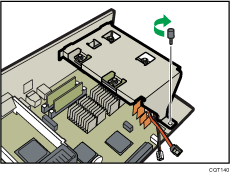
![]() Fasten the hard disk to the controller board with the remaining screw.
Fasten the hard disk to the controller board with the remaining screw.
![]() Connect the flat cable and power cord to the controller board.
Connect the flat cable and power cord to the controller board.
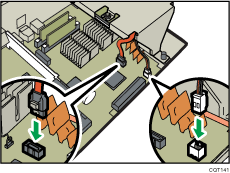
![]() If you are installing other options onto the controller board, proceed to install the next option without reinserting the controller board.
If you are installing other options onto the controller board, proceed to install the next option without reinserting the controller board.
For instructions about installing the the SDRAM module, see Installing the SDRAM module![]() .
.
For instructions about installing the Gigabit Ethernet board, see Installing the Gigabit Ethernet board![]() .
.
![]() Fit the controller board into the printer, and push it carefully until it stops.
Fit the controller board into the printer, and push it carefully until it stops.
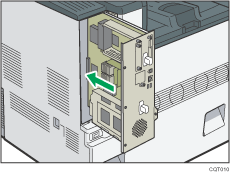
Push it firmly into the printer using the handle. The printer may malfunction if the controller board is not properly installed.
![]() Fasten the controller board to the printer using the screws.
Fasten the controller board to the printer using the screws.
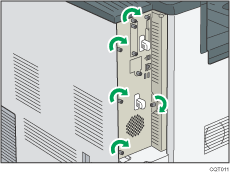
![]()
Confirm that the hard disk was correctly installed by printing the configuration page. If it is correctly installed, "Hard Disk" will appear for "Device Connection" on the configuration page. For information about printing the configuration page, see Test Printing
 .
.If the hard disk was not installed properly, repeat the procedure from the beginning. If it cannot be installed correctly even after reattempting installation, contact your sales or service representative.
Re-Install the controller board carefully. For details, see Cautions When Re-installing the Controller Board
 .
.To use the installed hard disk, configure the printer options in "Accessories" in the printer driver. For information about opening "Accessories", see "Configuring Option Settings for the Printer", Driver Installation Guide.
