To protect it from shock and vibration during transit, this printer comes packaged in cushioning foam and secured with tape. Remove these protective materials after bringing the printer to where it will be installed.
![]()
|
![]()
|
![]()
|
![]()
|
![]()
|
![]()
|
![]()
|
![]()
|
![]()
Removed tape is dirty. Be careful not to let it touch your hands or clothes.
Do not grip the tray area when lifting the printer.
Do not allow paper clips, staples, or other small metallic objects to fall inside the printer.
When using this printer for the first time, use the print cartridge that came with the printer.
![]() Remove the plastic bag.
Remove the plastic bag.
![]() Pull out tray 1, and then remove the red tag on the tray. Take out the items inside tray 1.
Pull out tray 1, and then remove the red tag on the tray. Take out the items inside tray 1.
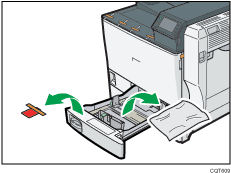
![]() Push the paper tray carefully into the printer until it stops.
Push the paper tray carefully into the printer until it stops.
![]() Pull out the handle from the right side of the printer.
Pull out the handle from the right side of the printer.
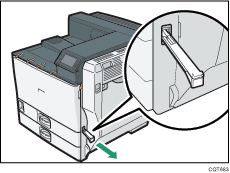
![]() Lift the printer with four people by using the handles on both sides of the printer.
Lift the printer with four people by using the handles on both sides of the printer.
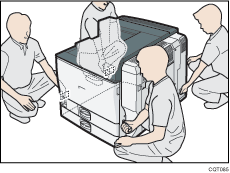
Leave the tape in place while moving the printer.
Lower the printer slowly and carefully to prevent trapping your hands.
![]() Return the handle you pulled out from the printer to its original position.
Return the handle you pulled out from the printer to its original position.
![]() Remove the tape indicated by the arrow. Do not remove the four strips of tape attached to the front cover.
Remove the tape indicated by the arrow. Do not remove the four strips of tape attached to the front cover.
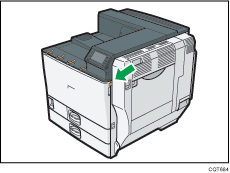
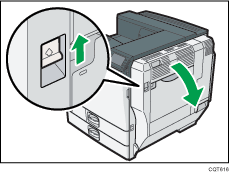
![]() Push up the lever on the right side, and open the printer's right cover carefully.
Push up the lever on the right side, and open the printer's right cover carefully.
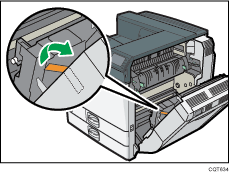
![]() Remove the tape.
Remove the tape.
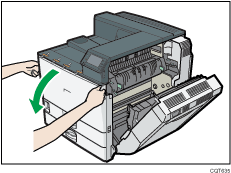
![]() Holding the left and right side grips, carefully open the front cover.
Holding the left and right side grips, carefully open the front cover.
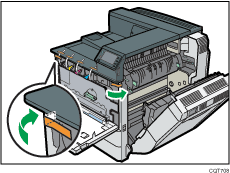
![]() Remove the tape.
Remove the tape.
![]() Close the right cover firmly until it clicks.
Close the right cover firmly until it clicks.
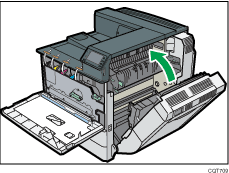
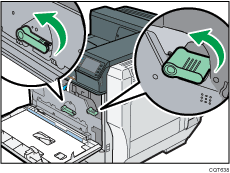
![]() Turn the two green levers counterclockwise.
Turn the two green levers counterclockwise.
![]() Pulling the handle, slowly open the inner cover.
Pulling the handle, slowly open the inner cover.
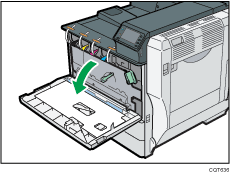
![]() Remove the orange tape from the printer.
Remove the orange tape from the printer.
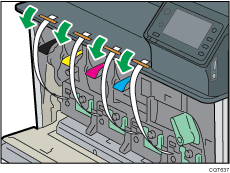
![]() Pull out the strips of tape horizontally. Be sure to pull out all four strips of tape.
Pull out the strips of tape horizontally. Be sure to pull out all four strips of tape.
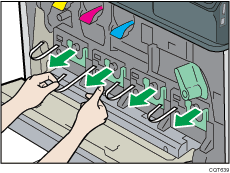
To avoid malfunctions, be sure to remove all four strips of tape from the photo conductor unit.
Removed tape is dirty. Be careful not to let it touch your hands or clothes.
![]() Pressing both sides, firmly close the inner cover.
Pressing both sides, firmly close the inner cover.
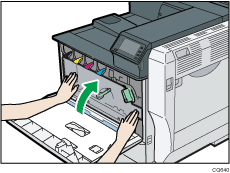
![]() Turn the two green levers clockwise to lock the cover.
Turn the two green levers clockwise to lock the cover.
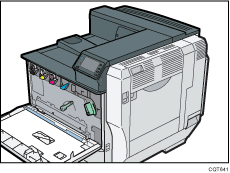
![]() Take the toner containers out of the box.
Take the toner containers out of the box.
![]() Shake the toner up and down five or six times.
Shake the toner up and down five or six times.
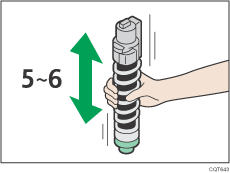
Even distribution of toner within the cartridge improves print quality.
![]() With the label facing up, fully insert the magenta toner into place, keeping the container horizontal.
With the label facing up, fully insert the magenta toner into place, keeping the container horizontal.
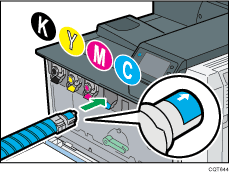
![]() Use the same procedure to insert the remaining toner. From the right: cyan (C), magenta (M), yellow (Y) and black (K).
Use the same procedure to insert the remaining toner. From the right: cyan (C), magenta (M), yellow (Y) and black (K).
![]() Close the front cover.
Close the front cover.
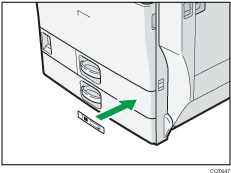
![]() Put the label "1" on the front of tray 1.
Put the label "1" on the front of tray 1.
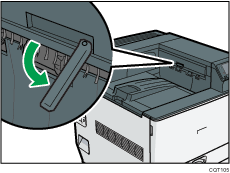
![]() Slide out the paper-full detector.
Slide out the paper-full detector.
The printer automatically stops ejecting paper when the paper-full detector detects that the standard output tray has become full.
When you have finished unpacking, do the following:
Check the procedures for setting up the printer. For details, see Printer Set Up Procedure |
