Basic Operation for Scan to USB (SG 3110SFNw only)
This section describes the basic operation for sending scanned files to a USB flash drive.
![]()
|
![]()
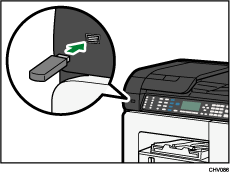
This machine does not support the use of USB flash drives connected to external USB hubs. Insert your USB flash drive directly into the USB flash drive port located at the top left corner of the machine.
Certain types of USB flash drives cannot be used.
![]() Insert your USB flash drive into the USB flash drive port.
Insert your USB flash drive into the USB flash drive port.

The message “Save Scn Data to USB” appears on the display.
![]() Press the [Scanner] key.
Press the [Scanner] key.
![]() Place the original on the exposure glass or in the ADF.
Place the original on the exposure glass or in the ADF.
![]() Press the [B&W Start] or [Color Start] key.
Press the [B&W Start] or [Color Start] key.
To scan in color, set [Original Type] to [Full Color: Text/Photo] in [Options].
To scan in black and white, set [Original Type] to anything except [Full Color: Text/Photo] in [Options].
To cancel scanning, press the [Clear/Stop] key.
When using the exposure glass, place the next original on the exposure glass, and then press the [B&W Start] or [Color Start] key. Repeat this step until all originals are scanned.
When all originals have been scanned, press [#] to start sending the scanned file.
![]() Wait until the message “Sending...” disappears.
Wait until the message “Sending...” disappears.
The scanned file is created in the root directory of the USB flash drive.
![]() Remove the USB flash drive from the machine.
Remove the USB flash drive from the machine.

