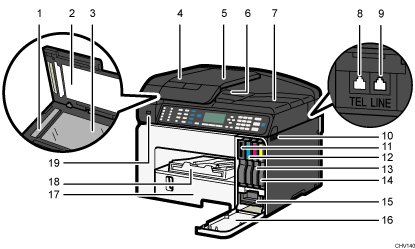
Front View

Scanning glass
Originals that are loaded in the ADF are scanned here.
Cover for the exposure glass
Open this cover to place originals on the exposure glass.
Exposure glass
Place originals face down here for copying, scanning, or faxing.
ADF (Auto document feeder) cover
Open this cover to remove originals jammed in the ADF.
Input tray for the ADF
Place stacks of originals here. They will feed in automatically. This document feeder can be used for two-sided originals.
Output tray for the ADF
Originals scanned with the ADF are delivered from here.
Paper guide
Raise the paper guide to prevent A4 or letter size originals from falling from the machine.
External telephone connector (SG 3110SFNw only)
Connect an external telephone.
G3 (Analog) line interface connector (SG 3110SFNw only)
Connect a telephone line.
Vent
Air is vented here to prevent the inside of the machine from getting too warm. Do not lean anything against the vent or block it in any way. If the inside of the machine gets too warm, a breakdown could occur.
Print cartridge (black)
Print cartridge (cyan)
Print cartridge (magenta)
Print cartridge (yellow)
Ink collector unit
Right front cover
Normally, keep this cover closed. Open this cover only when you need to install or replace the print cartridge or the ink collector unit.
Tray 1
Load paper here.
 (mainly North America)
If you want to print on paper larger than A4 or letter size, pull the tray extension out.
Output ramp
Prints are delivered on the output ramp.
Pull out when using large paper to keep the printed paper from falling.
USB flash drive port
Insert a USB flash drive for using the Scan to USB function or connect a digital camera using a USB cable for PictBridge printing.

