Basic Operation for Sending Faxes from a Computer
This section describes the basic operation for sending faxes from a computer.
You can select the destination from the LAN-Fax Address Book or enter the fax number directly. You can send faxes to up to 100 destinations at one time.
![]()
Before sending a fax, the machine stores all the fax data in memory. If the machine's memory becomes full while storing this data, the fax transmission will be canceled. If this happens, lower the resolution or reduce the number of pages and try again.
The following procedure is based on Windows 7 as an example. If you are using another operating system, the procedure might vary slightly.
![]() Open the file you want to send.
Open the file you want to send.
![]() On the [File] menu, click [Print...].
On the [File] menu, click [Print...].
![]() Select the LAN-Fax driver as the printer, and then click [Print].
Select the LAN-Fax driver as the printer, and then click [Print].
If necessary, configure the transmission settings in the LAN-Fax driver's properties before clicking [Print].

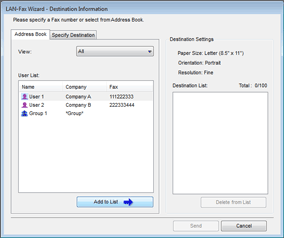
![]() To specify a destination from the LAN-Fax Address Book, select a destination from [User List:], and then click [Add to List].
To specify a destination from the LAN-Fax Address Book, select a destination from [User List:], and then click [Add to List].
Repeat this step to add more destinations.
![]() To directly enter a fax number, click the [Specify Destination] tab, enter a fax number (up to 40 digits) in [Fax Number:], and then click [Add to List].
To directly enter a fax number, click the [Specify Destination] tab, enter a fax number (up to 40 digits) in [Fax Number:], and then click [Add to List].
Repeat this step to add more destinations.
![]() If you want to attach a fax cover sheet, click [Edit Cover Sheet] on the [Specify Destination] tab, and then select the [Attach a Cover Sheet] check box.
If you want to attach a fax cover sheet, click [Edit Cover Sheet] on the [Specify Destination] tab, and then select the [Attach a Cover Sheet] check box.
Edit the cover sheet as necessary, and then click [OK].
![]() Click [Send].
Click [Send].
![]()
A fax number can contain 0 to 9, "P" (pause), "
 ", "
", " ", "-", and space.
If necessary, insert a pause in a fax number. The machine pauses briefly before it dials the digits following the pause. You can specify the length of the pause time in the [Pause Time] setting under fax transmission settings.
To use tone services on a pulse-dialing line, insert "
 " in a fax number. "
 " switches the dialing mode from pulse to tone temporarily.
To delete an entered destination, select the destination in the [Destination List:], and then click [Delete from List].
You can register the fax number you entered in the [Specify Destination] tab in the LAN-Fax Address Book. Click [Save to Address Book] to open the dialog box for registering a destination.
From the [View:] list, you can select the types of destinations to display.
[All]: Displays all destinations.
[Group]: Displays groups only.
[User]: Displays individual destinations only.
If sending faxes via LAN-Fax is restricted, you must enter a user code in the LAN-Fax driver's property before sending a fax.
If LDAP authentication is specified, you must enable user authentication and enter a user name and password in the LAN-Fax driver's properties before sending a fax job to the machine.
![]()
For details about configuring the transmission settings, see Configuring Transmission Settings
 .
.For details about [Pause Time], see Fax Transmission Settings
 .
.For details about editing a fax cover sheet, see Editing a Fax Cover Sheet
 .
.For details about entering a user code, see When Machine Functions are Restricted
 .
.For details about enabling user authentication and entering a user name and password, see When LDAP Authentication is Specified
 .
.

