Installing the Paper Feed Unit (Tray 2)
![]()
|
![]()
|
![]()
|
![]()
|
![]()
|
![]()
|
![]()
Tray 1 is required to print using the optional paper feed unit. Without Tray 1, paper jams will occur.
Do not grip the tray areas when moving the machine.
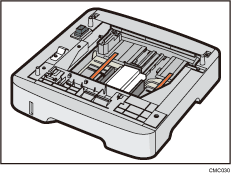
![]() Check that the package contains paper feed unit.
Check that the package contains paper feed unit.

![]() Turn off the power, and then unplug the machine's power cord from the wall outlet.
Turn off the power, and then unplug the machine's power cord from the wall outlet.
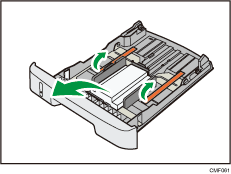
![]() Carefully pull the tray, and then pull it out with both hands.
Carefully pull the tray, and then pull it out with both hands.
Place the tray on a flat surface.
![]() Remove the protective material attached inside the tray.
Remove the protective material attached inside the tray.

![]() Carefully push the tray straight into the optional paper feed unit.
Carefully push the tray straight into the optional paper feed unit.
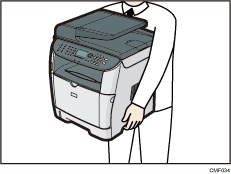
![]() Lift the machine using the inset grips on both sides.
Lift the machine using the inset grips on both sides.

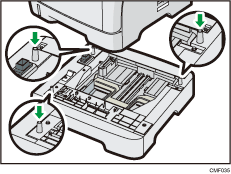
![]() There are three upright pins on the optional paper feed unit. Align them with the holes on the underside of the machine, and then carefully lower the machine onto them.
There are three upright pins on the optional paper feed unit. Align them with the holes on the underside of the machine, and then carefully lower the machine onto them.

![]() Plug the machine's power cord back into the wall outlet, and then turn on the power.
Plug the machine's power cord back into the wall outlet, and then turn on the power.
![]() After installing the option, print the configuration page to confirm the installation.
After installing the option, print the configuration page to confirm the installation.
If it is installed properly, "Tray 2" will appear under "Paper Input" on the configuration page.
![]()
After installing the optional paper feed unit, select tray 2 in the printer driver. For details, see the printer driver Help.
If the optional paper feed unit is not installed properly, reinstall it following this procedure. If you cannot install it properly even after attempting reinstallation, contact your sales or service representative.
![]()
For details about printing configuration page, see Printing the Configuration Page
 .
.For details about loading paper in tray 2, see Loading Paper in Tray 2
 .
.

