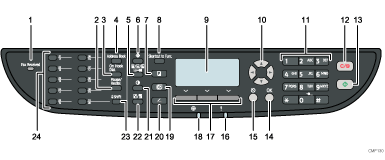
Control Panel
This section describes the names and usage of the parts of the control panel.
![]()
The actual control panel may look different from the illustration below, depending on the country of use.
If the machine remains turned off for a certain period of time (for example, when the power switch is turned off or when there is a power failure), all documents stored in memory will be lost. If the Fax Received indicator is lit or flashing, make sure to print out the stored documents before turning off the power (for example, prior to relocating the machine).

Fax Received indicator
Lights up when received faxes that have not been printed out exist in the machine's memory. Flashes when the machine is unable to print out the faxes due to machine errors such as an empty paper tray or a paper jam.
[Pause/Redial] key
Pause
Press to insert a pause in a fax number. The pause is indicated by “P”.
Redial
Press to display the last used scan or fax destination.
[On Hook Dial] key
Press to use on-hook dialing to check the destination's status when sending a fax.
[Address Book] key
Press to select a scan or fax destination from the Address Book.
[Image Quality] key
Press to select scan quality for the current job.
Copier mode: select Text, Photo, or Mixed.
Scanner mode: select the resolution.
Fax mode: select Standard, Detail, or Photo.
[User Tools] key
Press to display the menu for configuring the machine's system settings.
[Copy] key
Press to switch to copier mode. The key stays lit while the machine is in copier mode.
[Shortcut to Func.] key
Press to use the function pre-assigned for this key. Depending on the setting, one of the following functions can be used by one-touch:
Activate ID card copy mode for the current job
Enter the [Print Received File] menu under fax feature settings
Enter the [Immediate TX] menu under fax transmission settings
Open the scanner Address Book (for Scan to E-mail/FTP/Folder)
Enter the combined/2-sided copy menu for the current job
Screen
Displays current status and messages.
Scroll keys
Press to move the cursor in the directions indicated by each scroll key.
Pressing the [
 ][
][ ] keys while the machine is in standby mode will display the menu for configuring the settings of the machine's current operation mode (copier, scanner, or fax).
Number keys
Use to enter numerical values when specifying settings such as fax numbers and copy quantities, or enter letters when specifying names.
[Clear/Stop] key
While the machine is processing a job: press to cancel the current job.
While configuring the machine: press to cancel the current setting and return to standby mode.
While in standby mode: press to cancel temporary settings such as image density or resolution.
[Start] key
Press to scan, copy, or send a fax.
[OK] key
Press to confirm settings or enter the next level of the menu tree.
[Escape] key
Press to cancel the last operation or exit to the previous level of the menu tree.
Alert indicator
Flashes yellow when the machine will require maintenance soon (such as replacing a print cartridge), or lights up red when a machine error occurs.
When an alert is issued, check the messages on the screen and follow the instructions as provided in "Error and Status Messages on the Screen".
Selection keys
Press the key that corresponds to an item shown on the bottom line of the screen to select it.
Power indicator
Remains lit while the power is on. It is unlit when the power is off.
[Facsimile] key
Press to switch to fax mode. The key stays lit while the machine is in fax mode.
[Scanner] key
Press to switch to scanner mode. The key stays lit while the machine is in scanner mode.
[Density] key
Press to adjust image density for the current job.
Copier mode: select from 5 levels of density.
Scanner mode: select from 5 levels of density.
Fax mode: select from 3 levels of density.
[Reduce/Enlarge] key
Copier mode: press to specify the reduction or enlargement ratio for the current job.
Scanner mode: press to specify the scanning size according to the current original.
[Shift] key
Press to use the Quick Dial numbers 11 to 20 when specifying a scan or fax destination using the One Touch buttons.
One Touch buttons
Press to select a scan or fax Quick Dial destination.
![]()
The backlight of the screen is turned off when the machine is in Energy Saver mode.
When the machine is processing a job, you cannot display the menu for configuring the machine. You can confirm the machine's status by checking messages on the screen. If you see messages such as “Printing...”, “Copying...”, or “Processing...”, wait until the current job is finished.
A sticker for the control panel may be included, depending on the country of use. If included, apply the stickers appropriate for your language to the control panel. Note that if the control panel is covered with a protective sheet, be sure to remove it before applying the stickers.
![]()
For details about how to configure the [Shortcut to Func.] key, see Administrator Settings
 .
.For details about what to do when the Alert indicator is flashing or lit, see Error and Status Messages on the Screen
 .
.For details about what to do when the Fax Received indicator is flashing or lit, see Printing Out Faxes Stored in Memory
 .
.

