Changing the Host Interface Menu
Use the following procedure to change the network settings.
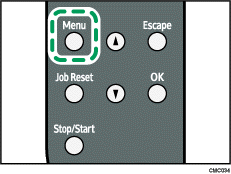
![]() Press the [Menu] key.
Press the [Menu] key.

The menu screen appears.
![]() Press the [
Press the [![]() ][
][![]() ] keys to select [Host Interface], and then press the [OK] key.
] keys to select [Host Interface], and then press the [OK] key.
![]() Press the [
Press the [![]() ][
][![]() ] keys to select [Network Setting], and then press the [OK] key.
] keys to select [Network Setting], and then press the [OK] key.
![]() Press the [
Press the [![]() ][
][![]() ] keys to select [IPv4 Config.], and then press the [OK] key.
] keys to select [IPv4 Config.], and then press the [OK] key.
![]() Press the [
Press the [![]() ][
][![]() ] keys to select [DHCP], and then press the [OK] key.
] keys to select [DHCP], and then press the [OK] key.
![]() Press the [
Press the [![]() ][
][![]() ] keys to select [Active] or [Inactive] according to the network environment, and then press the [OK] key.
] keys to select [Active] or [Inactive] according to the network environment, and then press the [OK] key.
If you select [Active], proceed to step 10.
![]() Press the [
Press the [![]() ][
][![]() ] keys to select [IP Address], and then press the [OK] key.
] keys to select [IP Address], and then press the [OK] key.
![]() Specify the printer’s IPv4 address using [
Specify the printer’s IPv4 address using [![]() ][
][![]() ] keys, and then press the [OK] key.
] keys, and then press the [OK] key.
To go to the next field, press the [OK] key.
To go back to the previous field, press the [Escape] key.
![]() Set the subnet mask and gateway address.
Set the subnet mask and gateway address.
Set values for each setting following the same procedure as for the IPv4 address.
![]() Press the [Menu] key to return to the initial screen.
Press the [Menu] key to return to the initial screen.
![]() Restart the printer to enable the network settings.
Restart the printer to enable the network settings.

