Editing a custom paper type’s settings
Use the following procedure to edit a custom paper type’s settings. For details about a specific setting, click the ![]() button to display the on-screen balloon help.
button to display the on-screen balloon help.
![]() On the [Setting] menu, select [Paper Catalog].
On the [Setting] menu, select [Paper Catalog].
You can also edit the settings by clicking [Paper Type] on the [Paper/Imposition/Finishing] screen.
![]() On the [Paper Catalog] screen, select the custom paper type that you want to edit from the [Custom paper name:] drop-down list.
On the [Paper Catalog] screen, select the custom paper type that you want to edit from the [Custom paper name:] drop-down list.
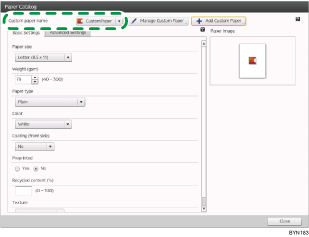
![]() Change the settings as necessary, and then click [Add Custom Paper].
Change the settings as necessary, and then click [Add Custom Paper].
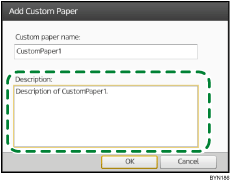
![]() On the [Add Custom Paper] screen, change the contents of [Description:] as necessary.
On the [Add Custom Paper] screen, change the contents of [Description:] as necessary.
When you edit a custom paper type’s settings, you cannot edit [Custom paper name:]. (Changing the name will register the paper type as a different paper type.)
![]() Click [OK].
Click [OK].
![]() On the overwrite confirmation screen, click [OK].
On the overwrite confirmation screen, click [OK].