Top Page > Getting Started > Overview of the Machine > Guide to Names and Functions of Components > Guide to Components ![]() (mainly North America)
(mainly North America)
![]()
Do not obstruct the ventilation holes by placing objects near them or leaning things against them. If the machine overheats, a fault might occur.
Front and left view
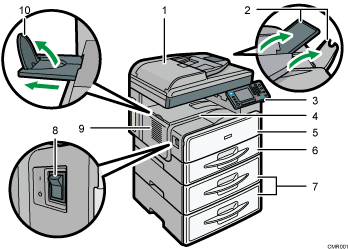
ADF
Lower the ADF over originals placed on the exposure glass.
If you load a stack of originals in the ADF, the ADF will automatically feed the originals one by one.
Extenders
Raise these extenders to support large paper.
Control panel
See Guide to the Names and Functions of the Machine's Control Panel
 .
.Internal tray
Copied/printed paper and fax messages are delivered here.
Front cover
Open to access the inside of the machine.
Paper tray
Load paper here.
Paper tray unit (Tray 2 and Tray 3)
Load paper here.
Main power switch
To operate the machine, the main power switch must be on. If it is off, turn the switch on.
Ventilation holes
Prevent overheating.
Internal tray guide
Open out and raise the end fence to support large paper.
Front and right view
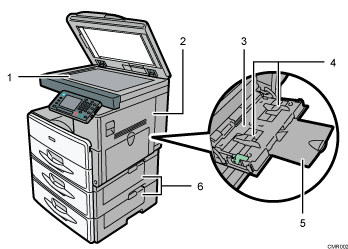
Exposure glass
Place originals face down here.
Right cover
Open this cover to remove jammed paper fed from the paper tray.
Bypass tray
Use to copy or print on OHP transparencies and label paper (adhesive labels).
Paper guides
When loading paper in the bypass tray, align the paper guides flush against the paper.
Extender
Pull this extender out when loading paper in the bypass tray.
Lower right cover
Open this cover when a paper jam occurs.
Rear and left view

Ventilation holes
Prevent overheating.