![]()
When printing is completed, the stored file will be deleted.
![]() Press the [Home] key on the top left of the control panel, and press the [Printer] icon on the [Home] screen.
Press the [Home] key on the top left of the control panel, and press the [Printer] icon on the [Home] screen.
![]() Press the [Print Jobs] tab.
Press the [Print Jobs] tab.
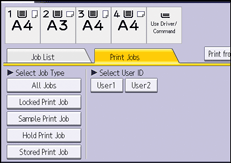
![]() Press [Sample Print Job].
Press [Sample Print Job].
![]() Select the files you want to print.
Select the files you want to print.
You can select all the Sample Print files at once by pressing [Select All Jobs] after selecting a file.
![]() Press [Print].
Press [Print].
![]() To change the print settings of the document, press [Detailed Settings].
To change the print settings of the document, press [Detailed Settings].
For details about the settings that can be configured, see Settings that Can Be Configured on the Control Panel![]() .
.
![]() Enter the number of copies using the number keys if necessary, and then press [Print].
Enter the number of copies using the number keys if necessary, and then press [Print].
![]()
If you change the number of copies when multiple documents are selected, the newly specified number of copies will be printed for all of the selected documents. If you do not change the number, the number of copies specified when the documents were stored will be printed for each document.
To stop printing after printing has started, press [Exit] until the printer screen appears, and then press [Job Reset] or the [Stop] key. The file will be deleted.
You can also print a Sample Print file from Web Image Monitor. For details, see Web Image Monitor Help.