This section describes the user tools in the Reception Settings menu under Facsimile Features.
Reception File Settings
Specify the output mode for receiving fax documents such as printing, storing on the hard disk, or forwarding to a registered receiver.
For details about Reception File Settings, see Reception File Settings![]() .
.
Switch Reception Mode
Specify the method for receiving fax documents.
Default: [Auto Reception]
Press [Facsimile Features].
Press [Reception Settings].
Press [Switch Reception Mode].
Select the reception mode, and then press [OK].
Press [Exit].
For details about reception mode, see Reception Modes![]() .
.
Program Special Sender
By programming particular receivers as special sender in advance, you can have special senders treated differently.
For details about how to program special sender, see Special Senders to Treat Differently![]() .
.
Program Special Sender: Print List
You can print the Special Sender List.
Press [Facsimile Features].
Press [Reception Settings].
Press [Program Special Sender: Print List].
Press the [Start] key.
Press [Exit].
Stored Reception File User Setting
The administrator can be specified for managing documents stored on the machine after fax documents are received. If you specify the administrator, you need to enter the administrator user code when accessing stored documents using Web Image Monitor. You can also restrict control panel operations such as printing or deleting received documents.
Default: [Off]
For details about Stored Reception File User Setting, see Stored Reception File User Setting![]() .
.
SMTP RX File Delivery Settings
Specify whether or not to route e-mails received via SMTP to other fax machines.
This function is available on systems that allow routing of e-mail received via SMTP.
Default: [Off]
For details about SMTP RX File Delivery Settings, see SMTP Reception File Delivery Settings![]() .
.
2 Sided Print
Specify whether or not received fax documents are to be printed on both sides of the paper.
Default: [Off]
Checkered Mark
Specify whether or not a checkered mark is to be printed on the first page of received fax documents.
Default: [On]
Centre Mark
Specify whether or not a center mark is to be printed halfway down the left side and at the top center of each page received.
Default:
![]() (mainly Europe and Asia)
(mainly Europe and Asia)
[On]
![]() (mainly North America)
(mainly North America)
[Off]
Print Reception Time
Specify whether or not the received date, time, and file number are printed at the bottom of received fax documents.
Default: [Off]
Reception File Print Quantity
Specify the number of copies to be printed for each fax document received.
1 to 10 set(s)
Default: [1 set(s)]
Paper Tray
Use this function to print fax documents received from programmed senders and fax documents from other senders, using different paper trays.
Display of tray names may differ depending on the options installed.
Default: [Auto Select]
Specify Tray for Lines
Specify a paper tray for each line (telephone, Internet Fax, IP-Fax).
Default: [Off]
If you select [Off], the received fax is delivered to a default tray.
Press [Facsimile Features].
Press [Reception Settings].
Press [Specify Tray for Lines].
Press [On].
Select the line type.
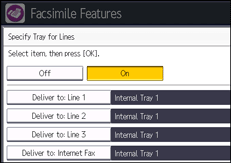
Select a tray to deliver the received paper onto, and then press [OK].
If you want to specify another line type, repeat from step 5.
Press [OK].
Press [Exit].
Folder Transfer Result Report
You can set whether the Folder Transfer Result Report is transmitted to the specified e-mail address, when folders are programmed as the forwarding destinations to which documents are sent from all senders or special senders.
Specify a group destination to transfer documents to multiple destinations. You must first register the destination for the Folder Transfer Result Report in the Address Book. See "Registering Addresses and Users for Facsimile/Scanner Functions", Connecting the Machine/ System Settings.
For the maximum number of destinations you can register in a group, see Maximum Values![]() .
.
Even if the Folder Transfer Result Report is not successfully transmitted, the report is not printed on this machine.
Default: [Do not E-mail]
Press [Facsimile Features].
Press [Reception Settings].
Press [Folder Transfer Result Report].
To send the Folder Transfer Result Report, press [E-mail].
To not send the Folder Transfer Result Report, press [Do not E-mail], and then press [OK].
Press the destination key of the e-mail address for notification, and then press [OK].
Configure the settings in "Security" as necessary.
To encrypt e-mails, press [Encryption].
To attach a signature to an e-mail, press [Signature].
After configuring the settings, press [OK].
Check the selected destination, and then press [OK].
Press [Exit].
For details about the "Security" setting, see Encryption and Signature for Internet Fax/E-mail![]() .
.
Remote Reception Setting per Line
When using the Remote Fax function, you can print received documents on a remote machine. You can specify a remote machine for each line used for reception.
Remote machines that you can specify are machines using the Remote Fax function.
Display of lines may differ depending on the options installed.
G3-1
G3-2
G3-3
Internet Fax
IP-Fax
To specify Remote Reception Setting per Line, follow the procedure below.
Press [Facsimile Features].
Press [Reception Settings].
Press
 [Next].
Press [Remote Reception Setting per Line].
Select the line type you want to register.
Press [Select] to the right of the remote machine you want to connect to, and then press [OK].
Press [OK].
Press [Exit].
![]()
For details about how to change the Facsimile Features, see "Accessing User Tools", Connecting the Machine/ System Settings.