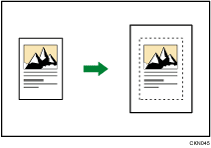
You can make copies with the image moved to the center of the copy paper.

![]()
You cannot use the bypass tray with this function.
The original sizes and orientations you can use with this function are as follows:
![]() (mainly Europe and Asia)
(mainly Europe and Asia)
Original location |
Original size and orientation |
|---|---|
Exposure glass |
A3 |
ADF |
A3 |
![]() (mainly North America)
(mainly North America)
Original location |
Original size and orientation |
|---|---|
Exposure glass |
11 × 17 |
ADF |
11 × 17 |
![]() Press [Edit / Stamp].
Press [Edit / Stamp].

![]() Press [Edit Image].
Press [Edit Image].
![]() Press [Centring].
Press [Centring].
![]() Press [OK].
Press [OK].
![]() Select the paper size.
Select the paper size.
![]()
Though the original is placed to a different orientation from the paper loaded, the machine will not rotate the image by 90 degrees (Rotate Copy).
