

  |  | ||
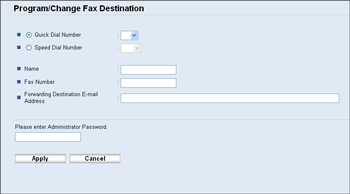
This section describes how to register destinations using Web Image Monitor.
Start the Web browser and access the machine by entering its IP address.
Click [Quick Dial Destination] or [Fax Speed Dial Destination].
From the [Destination Type] list, select [Fax].
Select [Quick Dial Number] or [Speed Dial Number], and then select the registration number from the list.
Register information as necessary.
Enter the administrator password if required.
Click [Apply].
Close the Web browser.
Fax destination settings

Item |
Setting |
Description |
|---|---|---|
Quick Dial Number / Speed Dial Number |
Required |
Select the number to which you want to register Quick Dial or Speed Dial destination. |
Name |
Optional |
Name of the destination. The name specified here will be shown on the screen when selecting a fax destination. Can contain up to 20 characters. |
Fax Number |
Optional |
Fax number of the destination. Can contain up to 40 characters. If the machine is connected to the telephone network through a PBX, make sure to enter the outside line access number specified in [PBX Access Number] before the fax number. |
Forwarding Destination E-mail Address |
Optional |
E-mail address of the destination of the Internet Fax. Can contain up to 64 characters. This setting appears only for the Type 2 model. |
![]()
A fax number can contain 0 to 9, "P" (pause), "![]() ", "
", "![]() ", "-", and space.
", "-", and space.
If necessary, insert a pause in the fax number. The machine pauses briefly before it dials the digits following the pause. You can specify the length of the pause time in the [Pause Time] setting under fax transmission settings.
To use tone services on a pulse-dialing line, insert "![]() " in the fax number. "
" in the fax number. "![]() " switches the dialing mode from pulse to tone temporarily.
" switches the dialing mode from pulse to tone temporarily.
![]()
For details about [Pause Time], see Fax Transmission Settings.
For details about [PBX Access Number], see Administrator Settings.
For details about using Web Image Monitor, see Using Web Image Monitor