Setting Envelopes Using the Control Panel
Follow the procedure below to set the machine using the control panel when loading envelopes onto the bypass tray.
![]()
If you select [Machine Setting(s)] in [Bypass Tray] under [Tray Setting Priority] in [System] of [Printer Features], the settings made using the control panel have priority over the printer driver settings. For details about [System] settings, see "System".
When printing on envelopes, select envelope for the paper type using both the printer driver and the control panel.
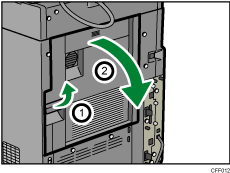
![]() Pull up on the lever to open the rear cover.
Pull up on the lever to open the rear cover.
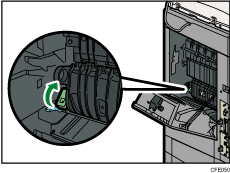
![]() Raise the envelope lever.
Raise the envelope lever.
![]() Close the rear cover.
Close the rear cover.
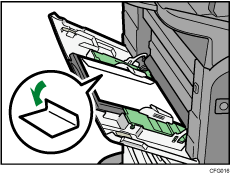
![]() Open the bypass tray and set the envelopes print side up, flaps closed and pointing toward the left side of the machine. Push the envelopes into the machine until you hear the beep.
Open the bypass tray and set the envelopes print side up, flaps closed and pointing toward the left side of the machine. Push the envelopes into the machine until you hear the beep.
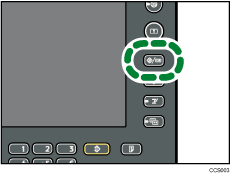
![]() Press the [User Tools/Counter] key on the control panel.
Press the [User Tools/Counter] key on the control panel.
![]() Press [System Settings].
Press [System Settings].
![]() Press the [Tray Paper Settings] tab.
Press the [Tray Paper Settings] tab.
![]() Press [Printer Bypass Paper Size].
Press [Printer Bypass Paper Size].
![]() Select the envelope size, and then press [OK].
Select the envelope size, and then press [OK].
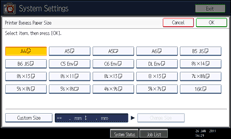
![]() Press [
Press [![]() Next] to scroll through the list.
Next] to scroll through the list.
![]() Press [Paper Type: Bypass Tray].
Press [Paper Type: Bypass Tray].
![]() Press [Envelope] on the “Paper Type” area.
Press [Envelope] on the “Paper Type” area.
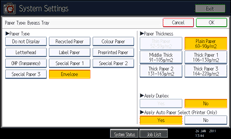
![]() Select the paper thickness, and then press [OK].
Select the paper thickness, and then press [OK].
![]() Press the [User Tools/Counter] key.
Press the [User Tools/Counter] key.
The initial screen appears. Also, make the paper settings using the printer driver.
When the print job is finished, be sure to return the envelope lever to its original position.
![]()
To print onto custom size envelopes, you must specify the envelope's dimensions. Measure the horizontal dimension of the envelope with the flap closed.
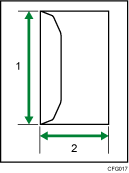
Vertical size
Horizontal size
Check the envelopes are not damp.
Load only as much envelopes as can be held between the paper guides on the bypass tray. For the number of envelopes that you can set on the bypass tray, see "Recommended Paper Sizes and Types", About This Machine.
Check there is no air in the envelopes before loading.
Before loading envelopes, flatten leading edges (the side going into the machine) by pressing a pencil or ruler across them.
To get better print quality, it is recommended that you set the leading-edge print margin to at least 15 mm (0.6 inches) and the other margins to at least 10 mm (0.4 inches) each.
Load only one size and type of envelope at a time.
Before loading envelopes, check they are rectangular in shape.
For details about supported envelope types, see "Envelopes", About This Machine.
You can also use paper trays (other than the bypass tray) to print on envelopes. For details about supported envelope types, see "Recommended Paper Sizes and Types", About This Machine.

