Placing Originals on the Exposure Glass
Place originals on the exposure glass.
![]()
Do not lift the ADF forcefully. Otherwise, the cover of the ADF might open or be damaged.
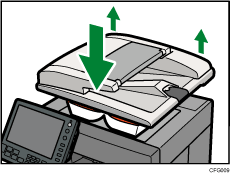
![]() Lift the ADF.
Lift the ADF.
![]() Place the original face down on the exposure glass. The original should be aligned to the rear left corner.
Place the original face down on the exposure glass. The original should be aligned to the rear left corner.
Start with the first page to be copied.

Positioning mark
![]() Lower the ADF.
Lower the ADF.
![]()
When you place a thick book or three-dimensional original on the exposure glass and lower the ADF, the back side of the ADF rises up to accommodate the original. Keep your hands away from the hinges at the back of the ADF when you close it.
The machine cannot detect the size of the original automatically. Specify the original size. However, if [Use Paper Tray Settg] is specified in Original Settings, you do not have to specify the size of the original. For details about how to specify the original size, see “Specifying Original Sizes”. For details about [Use Paper Tray Settg], see “Using paper tray settings”.
When the Sort, Combine, or 1 Sided
 2 Sided function has been set, press the [
 ] key after all originals have been scanned.
Make sure the original is pressed flat against the exposure glass. If you do not place the originals so that the source lights can shine on them, printouts may lack in uniformity.