
| |||
If the friction pad or paper feed roller is dirty, a multi-feed or misfeed might occur.
In this case, clean the friction pad and paper feed roller as follows:
![]()
|
![]()
|
![]()
|
![]()
|
![]()
|
![]()
Do not use chemical cleaners or organic solvents such as thinners or benzine.
Turn off the power switch.
Pull out the plug from the socket. Remove all the cables from the printer.
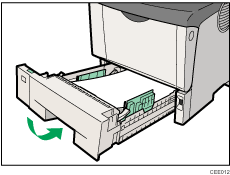
Lift the paper tray slightly, and then pull it out until it stops.

Lift the front side of the tray, and then pull it out of the printer.
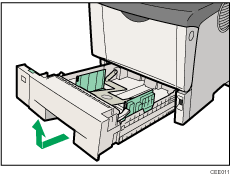
Place the tray on a flat surface. When there is paper in the tray, remove paper.
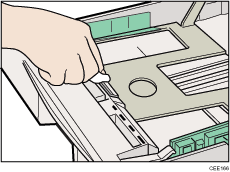
Wipe the friction pad with a damp cloth.
Move the printer to the edge of a stable table or desk.
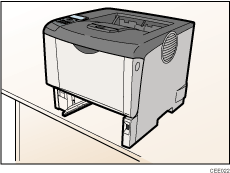
Do not put the printer on an unstable or tilted surface.
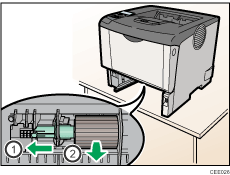
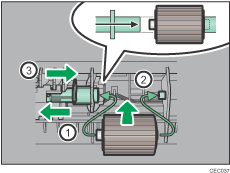
Slide the green lock lever to the left (![]() ), so that the paper feed roller can be released (
), so that the paper feed roller can be released (![]() ).
).
Wipe the rubber part of the roller with a soft damp cloth. Then, wipe it with a dry cloth to remove the water.
While sliding the green lock lever to the left (![]() ), set the paper feed roller to its original position (
), set the paper feed roller to its original position (![]() ). After that, return the green lock lever to its original position (
). After that, return the green lock lever to its original position (![]() ).
).
Check the green lock lever secures the roller correctly by making sure the new roller rotates smoothly.
Slide Tray 1 along the rails, and push it carefully all the way into the printer.
Do not slide the paper tray in with force. If you do, the front and side guides might move.
Insert the plug of the power cord into the wall socket securely. Connect all the interface cables that were removed.
Turn the power switch on.
![]()
If misfeeds or multi-feeds of paper occur after cleaning the friction pad and paper feed roller, contact your sales or service representative.
If the optional paper feed unit is installed, clean its friction pad and paper feed roller in the same way as those of the main paper feed unit.
| Copyright (C) 2010 |