Specifying custom size paper for the bypass tray
![]()
The custom size paper selected using the printer driver overrides that selected using the control panel, so do not make settings using the control panel if you have already made settings using the printer driver.
When [Machine Setting(s)] is selected for [Tray Setting Priority] under [Machine Modes] in [Print Settings], any settings made using the printer's control panel have priority over any settings made using the printer driver.
You cannot print on custom size paper with an application that does not support the custom size setting.
For details about the printer driver, see the printer driver Help.
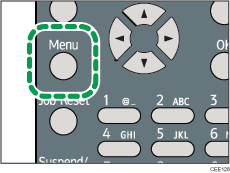
![]() Press the [Menu] key.
Press the [Menu] key.
![]() Press the [
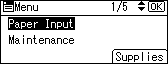
Press the [![]() ] or [
] or [![]() ] key to select [Paper Input], and then press the [OK] key.
] key to select [Paper Input], and then press the [OK] key.
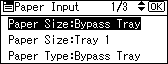
![]() Press the [
Press the [![]() ] or [
] or [![]() ] key to select [Paper Size:Bypass Tray], and then press the [OK] key.
] key to select [Paper Size:Bypass Tray], and then press the [OK] key.
![]() Select [Custom Size] using the scroll keys, and then press the [OK] key.
Select [Custom Size] using the scroll keys, and then press the [OK] key.

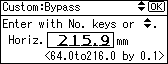
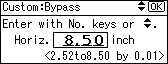
![]() Enter the horizontal value, and then press the [OK] key.
Enter the horizontal value, and then press the [OK] key.
![]() (mainly Europe and Asia)
(mainly Europe and Asia)
![]() (mainly North America)
(mainly North America)
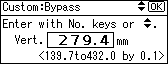
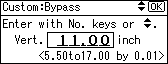
![]() Enter the vertical value, and then press the [OK] key.
Enter the vertical value, and then press the [OK] key.
![]() (mainly Europe and Asia)
(mainly Europe and Asia)
![]() (mainly North America)
(mainly North America)
![]() Press the [Menu] key to return to the initial screen.
Press the [Menu] key to return to the initial screen.
![]()
After specifying the paper size, specify a paper type using the control panel or printer driver. For details on specifying a paper type using the control panel, see Specifying a paper type for the bypass tray
 .
.For details about the printer driver, see the printer driver Help.