Sending to an E-mail Address
This section explains how to specify an e-mail address as a destination.
When using Internet Fax transmission, specify the e-mail address in place of the fax number.
![]()
To use Internet Fax functions, the Hard Disk Drive Option and printer/scanner functions must be installed.
To send Internet Fax, you must specify the sender.
The sender must be registered in the Address Book in advance. Register his/her e-mail address and register as [Sender Only] or [Dest. & Sender] using “Address Book Management” in “System Settings”. For details about these settings, see “Registering Addresses and Users for Facsimile/Scanner Functions”, Network and System Settings Guide.
Internet Fax is performed using Memory Transmission, which automatically starts transmission after storing documents in memory.
If you specify an Internet Fax destination after selecting Immediate Transmission, the mode switches to Memory Transmission.
If you try to select Immediate Transmission after specifying an Internet Fax destination, the “Dest. and functions that could not be specified on immediate transmission is already selected.” message appears. When this happens, press [Exit].
![]() Press [
Press [![]() ] to display
] to display ![]() .
.
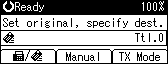
![]() Press [Manual].
Press [Manual].
![]() Enter the e-mail address destination, and then press the [OK] key.
Enter the e-mail address destination, and then press the [OK] key.
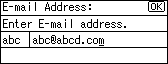
If you enter an incorrect character, press the [Clear/Stop] key. Then, re-enter the characters correctly.
To change the e-mail address after pressing the [OK] key, press [EditDest], re-enter an e-mail address, and then press the [OK] key.
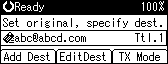
![]() To add a destination, press [Add Dest].
To add a destination, press [Add Dest].
![]() Specify the next destination.
Specify the next destination.
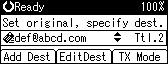
To add another destination, repeat steps 4 and 5.
Pressing [![]() ] switches the destination type between
] switches the destination type between ![]() and
and ![]() .
.
![]() Specify the sender.
Specify the sender.
For details, see “Sender Settings”.
![]() Press the [Start] key.
Press the [Start] key.
The machine starts to scan the original and stores it in memory. When scanning ends, the Communicating indicator lights and transmission starts.
![]()
Depending on the security settings, [Manual] might not appear and you might not be able to enter the e-mail address.
To specify a destination using a Quick Dial key, see “Using the Quick Dial Keys”.
For details about text entry, see “Entering Text”, About This Machine.
For details about canceling a transmission, see “Canceling a Transmission”.
The Fax Features menu includes a user parameter setting (switch 17, bit 2) that enables you to configure the machine to force the user to press [Add Dest] whenever s/he specifies a destination using a destination key. This prevents users accidentally sending documents to the wrong destination. See “Parameter Settings”.
For the maximum number of digits that can be included in a destination, see “Maximum Values”.
When the sender is specified, the transmission result etc. is sent to the sender's e-mail address.
If “Auto Specify Sender Name” is set to “On”, the sender is automatically specified and you can omit the procedure for specifying a sender. If “On” is selected, either the administrator's or this machine's e-mail address appears in the “From” field. For details about Auto Specify Sender Name, see “System Settings”, Network and System Settings Guide.
If “Auto Specify Sender Name” is set to “Off” in “System Settings” and no e-mail address is registered for the sender you specified, Internet Fax documents cannot be sent.
![]()