Scanning the entire area of a custom size original
This section explains how to specify a custom size for scanning the entire area of an original. If you want to scan the entire area of a custom size original, select [Custom Size] as the scan size.
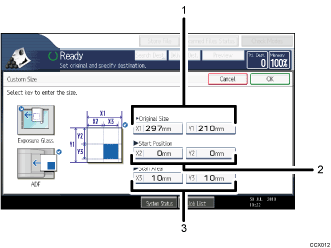
To display the custom size setting screen, on the initial scanner screen, press [Scan Settings] > [Scan Size] > [Custom Size].
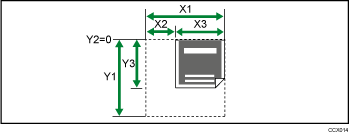
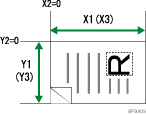
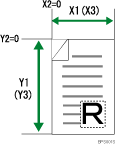
The following tables explain how to measure custom size originals and how to specify the scan settings on the custom size settings screen.
How to measure sizes
Orientation and placement of original |
Measuring method for scanning the entire area of a custom size original |
|---|---|
In the |
|
In the |
|
Scan settings on the custom size setting screen

Original Size (X1 and Y1)
Specify the length and width of the original.
Enter the actual width and length in [X1] and [Y1], respectively, and then press the [
 ] key.
Start Position (X2 and Y2)
Set Start Position to 0 mm (0 inch).
Enter "0" in both [X2] and [Y2], and then press the [
 ] key.
Scan Area (X3 and Y3)
Specify the same values as Original Size (X1, Y1).
Enter the same values in [X3] and [Y3] as Original Size (X1 and Y1 respectively), and then press the [
 ] key.
![]()
For X1, you can specify 140 mm (5.5 inches) or longer. For Y1, you can specify 128 mm (5.0 inches) or longer.
When scanning originals using [Custom Size], you cannot enter specific values in [Original Size] and [Start Position]. To configure the scan area, specify [Scan Area] and [Start Position] first, and then [Original Size].
To scan an original whose horizontal dimension is shorter than 140 mm (5.5 inches) or whose vertical dimension is shorter than 128 mm (5.0 inches), configure the settings as though you were scanning an area within a larger original. For example: to scan a CD label on the exposure glass, specify X1 - X3 and Y1 - Y3 based on the chart below. For details about scanning procedures, see "Scanning part of a custom size original".

For details about how to place originals, see "Setting of Original Feed Type".


