Basic Procedure
This section describes the basic procedure for making copies.
![]()
When User Code Authentication is set, enter your user code (up to eight digits) with the number keys so that the machine accepts copy jobs. For details about Administrator Tools, see “System Settings”, Network and System Settings Reference.
When Basic Authentication, Windows Authentication, LDAP Authentication, or Integration Server Authentication is set, enter your login user name and password so that the machine accepts copy jobs. Ask the administrator for the login user name and password. For details, see “When the Authentication Screen is Displayed”, About This Machine.
To copy onto paper other than plain paper, specify the paper type in User Tools. For details, see “System Settings”, Network and System Settings Reference.
When removing copies from the internal tray, do so carefully to avoid scuffing the printed side. If you are making many copies, remove them in small batches.
The following procedure explains copying onto paper whose size and orientation matches that of the originals exactly.
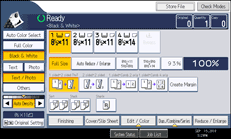
![]() Make sure “Ready” appears on the screen.
Make sure “Ready” appears on the screen.
If any other function is displayed, press the [Copy] key under the display panel on the left side of the control panel.
Initial copy screen

![]() Make sure no previous settings remain.
Make sure no previous settings remain.
When there are previous settings remaining, press the [Clear Modes] key.
![]() Select the paper tray containing the paper that is the same size and orientation as the originals.
Select the paper tray containing the paper that is the same size and orientation as the originals.
![]() Make sure that [Use Paper Tray Settg] is selected.
Make sure that [Use Paper Tray Settg] is selected.
When [Use Paper Tray Settg] is selected, the paper size and orientation of the tray you have selected will appear in Original Settng.
![]() Specify the copy settings you require.
Specify the copy settings you require.
![]() Enter the number of copies with the number keys.
Enter the number of copies with the number keys.
The maximum copy quantity that can be set is 999.
![]() Place the originals.
Place the originals.
![]() Press the [Start] key.
Press the [Start] key.
The machine starts copying.
When placing originals on the exposure glass, press the [![]() ] key after all originals are scanned.
] key after all originals are scanned.
![]() When the copy job is finished, press the [Clear Modes] key to clear the settings.
When the copy job is finished, press the [Clear Modes] key to clear the settings.
![]()
After logging in the machine, be sure to log out of it to prevent unauthorized usage.
To stop the machine during a multi-copy run, press the [Clear/Stop] key.
To cancel all copy functions and return the machine to the default condition, press the [Clear Modes] key.
To clear entered values, press the [Clear/Stop] key or [Cancel] on the screen.
To confirm settings, press [Check Modes].
You can change the maximum copy quantity under Max. Copy Quantity in User Tools. For details about Max. Copy Quantity, see “General Features”.
The machine cannot detect the size of the original automatically. Specify the original size. However, if [Use Paper Tray Settg] is specified in Original Settings, you do not have to specify the size of the original. For details about how to specify the original size, see “Specifying Original Sizes”. For details about [Use Paper Tray Settg], see “Using paper tray settings”.
Specify the size and orientation of originals when copying onto paper whose size or orientation is different from that of the originals. For details about how to specify the original size, see “Specifying Original Sizes”.
Certain functions require you to specify the size of the originals. For details, see the procedures of the function that you want to use.
We recommend that you place A5 originals in the landscape (
 ) orientation.

