


  |  | ||
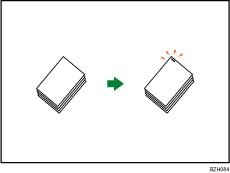
Each copy set can be stapled together.
![]()
You cannot use the bypass tray with this function.
Original orientation and stapling position
Place all the originals in the ADF in the orientation in which they can be read normally. When placing the original on the exposure glass, keep the same orientation, but set the original facing downwards.
The relationship between the orientation in which you place the original and the staple positions is as follows:
Finisher SR790
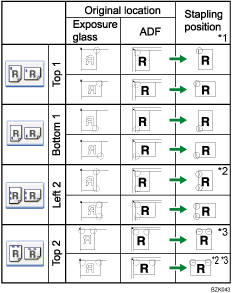
Finisher SR3050 (Type 1 and 2)
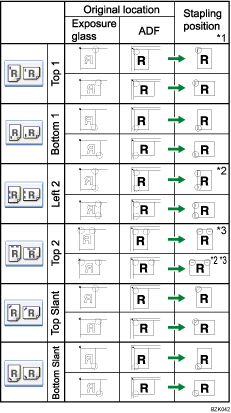
Booklet Finisher SR3000 (Type 1 and 2)
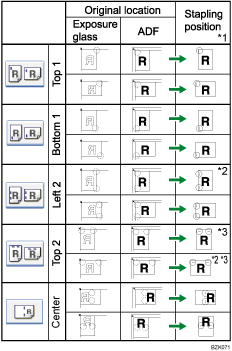
Finisher SR3030 / Booklet Finisher SR3020 (Type 3 and 4)
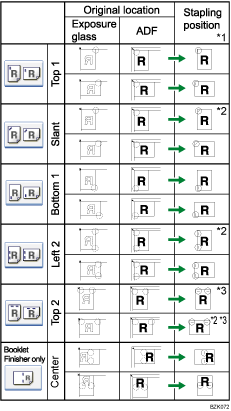
*1 The above tables show staple positioning. The orientation of the paper does not indicate orientation of delivery.
*2 You cannot staple at this position when copying onto the following paper sizes: A3, B4 JIS, 11 × 17, 81/2 × 14, 81/2 × 13, 81/4 × 13, 8 × 13
*3 If you want to staple at this position, select unreadable orientation in Original Orientation and then select Top 2.
Press [Finishing].
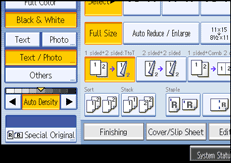
Select one of the stapling positions.
When Finisher SR790 is attached:
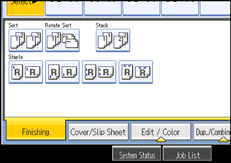
When Finisher SR3050 is attached (Type 1 and 2):
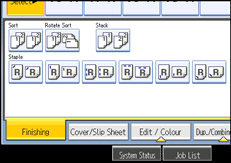
When Booklet Finisher SR3000 is attached (Type 1 and 2):
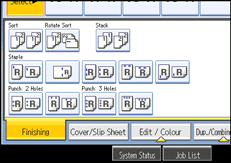
When Finisher SR3030 is attached (Type 3 and 4):
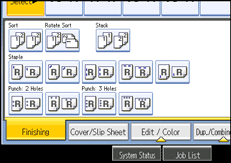
When Booklet Finisher SR3020 is attached (Type 3 and 4):
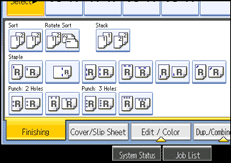
When you select a stapling position, Sort is automatically selected.
Enter the number of copy sets with the number keys.
Press [OK].
Place the originals, and then press the [Start] key.
![]()
When placing originals on the exposure glass, start with the first page to be copied. When placing originals in the ADF, set so that the first page is on the top.
When placing originals on the exposure glass, or in the ADF using Batch mode, press the [![]() ] key after all the originals have been scanned.
] key after all the originals have been scanned.
If you specify Staple: Center, you must specify the Magazine function. For details about Magazine, see “Booklet/Magazine”.
You can change the staple positions shown on the initial display under Input / Output in User Tools. For details about staple positions, see “Input / Output”.
The following type of paper cannot be stapled:
Postcard
Translucent paper
OHP transparencies
Label paper (adhesive labels)
Coated paper
Envelopes
Thick paper
Curled paper
Paper of low stiffness
You can specify how the machine responds if its memory becomes full during copying, or if the number of copies exceeds the capacity of the stapler:
Divides the copies into the number of sheets that can be stapled
Cancels the stapling job
To specify Left 2, Top 2, or Slant together with 2 Originals or 8 Originals of Combine 1 Side, or 4 Originals or 16 Originals of Combine 2 Sides: specify ![]() paper for
paper for ![]() orientation originals and specify
orientation originals and specify ![]() paper for
paper for ![]() orientation originals.
orientation originals.
To specify Left 2, Top 2, or Slant together with Double Copies: specify ![]() paper for
paper for ![]() orientation originals and specify
orientation originals and specify ![]() paper for
paper for ![]() orientation originals.
orientation originals.
Even if you place different size originals in the ADF, appropriate size of copy paper can be automatically selected and stapled using the Mixed Sizes mode and Auto Paper Select function. Load the paper you want to use in the paper trays beforehand. Paper sizes that can be stapled when using the Mixed Sizes mode are as follows:
A3![]() and A4
and A4![]()
B4 JIS![]() and B5 JIS
and B5 JIS![]()
11 × 17![]() and 81/2 × 11
and 81/2 × 11![]()
8K![]() and 16K
and 16K![]()
When stapling B4 JIS![]() , 81/2 × 14
, 81/2 × 14![]() or larger paper sizes, be sure to extend the paper support plate of the finisher tray.
or larger paper sizes, be sure to extend the paper support plate of the finisher tray.
You cannot change stapling positions during copying.
When the original image is rotated, the staple orientation changes by 90 degrees.
The maximum original image size that can be rotated is A4.
When using Slant, Left 2, or Top 2 with the Combine, Double Copies or Auto Reduce / Enlarge function, "Orig. and paper orientation mismatched for Staple mode. Cancel Staple mode or change paper orientation in tray." message may appear depending on the orientation of originals and paper you placed. In this case, change the paper orientation.
When Top or Bottom is selected and the paper with the same orientation as the original is not loaded, the image is rotated and the paper with the same size and the different orientation is selected.
When Left 2, or Top 2 is selected, the following settings are useful to rotate images appropriately:
Auto Reduce / Enlarge or Auto Paper Select
Replace Auto Tray Switching with With Image Rotation in User Tools.
If you select Center with the booklet finisher, the machine staples and folds the paper in the center, then delivers the paper folded.
If you select Center for the Magazine function, the machine staples the paper, and folds it like a book, then delivers the paper folded.
When the number of copies exceeds tray capacity, copying stops. If this happens, remove the copies from the finisher tray to resume copying.
Depending on the settings for the Staple, you may not be able to use the Rotate Copy function.
For details about the number of sheets that can be stapled together, the paper weight that can be stapled, and the number of stapled copies that can be stacked on each tray, see “Appendix”, About This Machine.