

  |  | ||
This section explains how to install only the printer driver when the printer is connected to a computer via USB.
If you installed the printer driver by performing Quick Install for USB, there is no need to install it again here.
![]()
Only administrators can perform this installation. Log on as a member of the Administrators group.
Do not turn on the power at this point.

The following explanation uses Windows XP as an example. Procedures under other operating systems may differ.
Screens vary according to the operating environment.
Start Windows, and insert the provided CD-ROM into the CD-ROM drive.
Quit all other applications currently running.
When you start Windows, the Add New Hardware Wizard may appear. If this happens, click [Cancel]. Check again that the power is off, and then proceed to step 2.
Auto Run might not work automatically with certain OS settings. If this is the case, double-click the CD-ROM drive icon under [My Computer] or [Explorer], and then double-click [SETUP.EXE] or double-click the [RDISETUP.EXE] icon in the [DRIVERS] folder.
Select a language for the interface, and then click [OK].
Click [Printer Driver].
If your model is the GX e3350N, click [PCL/RPCS Raster Printer Drivers].
Read the entire license agreement carefully. If you accept its terms, click [I accept the agreement.], and then click [Next >].
Click [Connected with USB cable], and then click [Next >].
Check again that the power of the printer is off, and then click [Next >].
Check that the dialog box below appears.
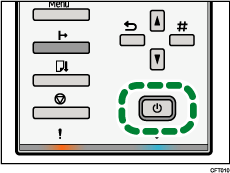
Make sure that the computer and printer are properly connected, and then press the [Power] key.

Installation starts.
Select whether or not to open the Status monitor automatically, and then click [Next >].
Check the installation result, and then click [Finish].
![]()
If the message "Digital Signature Not Found" or the [Found New Hardware Wizard] or [Hardware Installation] dialog box appears:
Click [Yes], [Continue Anyway] or [Install this driver software anyway] to continue the installation.
If the message prompting you to restart the computer appears, restart the computer.
Confirm the printer driver is correctly installed by checking that the [Power] key of the printer is lit and performing a test print.
To perform a test print, open the printer properties dialog box, click [Print Test Page] on the [General] tab.
If Windows Firewall is installed on the print server, configure exceptions in the firewall before using Status Monitor.
For details about configuring the Windows Firewall settings, see "Status Monitor Errors".
![]()
For details about installing User Guide only, see Installing User Guide.
For details about sharing the printer, see Sharing the Printer.