

  |  | ||
You can adjust the registration of each tray. The vertical adjustment is used for all trays. Normally, you need not update the registration. But when the optional paper feed unit or the duplex unit is installed, updating is useful in some cases.
Press the [Menu] key.

Press the [![]() ] or [
] or [![]() ] key to select [Maintenance], and then press the [OK] key.
] key to select [Maintenance], and then press the [OK] key.

Press the [![]() ] or [
] or [![]() ] key to select [Quality Maintenance], and then press the [OK] key.
] key to select [Quality Maintenance], and then press the [OK] key.

Press the [![]() ] or [
] or [![]() ] key to select [Registration], and then press the [OK] key.
] key to select [Registration], and then press the [OK] key.

Press the [![]() ] or [
] or [![]() ] key to select [Print Test Sheet], and then press the [OK] key.
] key to select [Print Test Sheet], and then press the [OK] key.

Press the [![]() ] or [
] or [![]() ] key to select the tray you want to adjust, and then press the [OK] key.
] key to select the tray you want to adjust, and then press the [OK] key.
Print the test sheet to preview the settings.
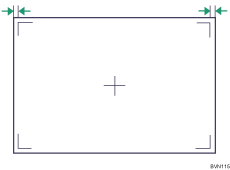
Confirm the position of the image on the test sheet, and then adjust the registration value.

In this setting, adjust the margins of the test sheet so that they are equal in size.
Press the [Escape] key to return to the registration menu.
Press the [![]() ] or [
] or [![]() ] key to select [Adjustment], and then press the [OK] key.
] key to select [Adjustment], and then press the [OK] key.

Press the [![]() ] or [
] or [![]() ] key to select the tray you want to adjust, and then press the [OK] key.
] key to select the tray you want to adjust, and then press the [OK] key.

Press the [![]() ] or [
] or [![]() ] key to change the registered value (mm).
] key to change the registered value (mm).

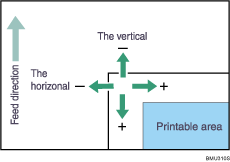
Increase the value to shift the print area in the positive direction, and decrease to shift in the negative direction.

Pressing the [![]() ] or [
] or [![]() ] key makes the value increase or decrease by 0.1 mm steps.
] key makes the value increase or decrease by 0.1 mm steps.
Press the [OK] key to return to the [Registration] menu.
Print the test sheet to confirm the adjustment result.
Press the [Menu] key.
The display returns to the initial screen.