Attaching the Duplex Unit
![]()
If you attach the duplex unit and the paper feed unit, the paper feed unit must be attached prior to attaching the duplex unit.
Check the printer nameplate to confirm the model code.
![]() Check the contents of the box for the following items:
Check the contents of the box for the following items:
![]() Turn off the power of the printer, and then unplug the power cable.
Turn off the power of the printer, and then unplug the power cable.
![]() Remove the adhesive tape and paper.
Remove the adhesive tape and paper.
![]() Open the rear cover.
Open the rear cover.
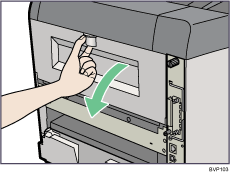
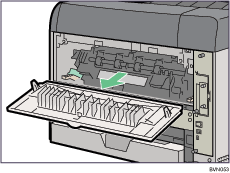
![]() Lower the rear cover until it is horizontal, and then pull it away.
Lower the rear cover until it is horizontal, and then pull it away.
![]() Place the power cable inside the slot on the side of the duplex unit, and then push the duplex unit along the rails in the back of the printer.
Place the power cable inside the slot on the side of the duplex unit, and then push the duplex unit along the rails in the back of the printer.
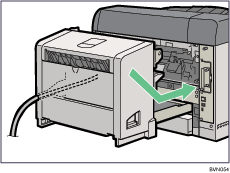
![]() Push the duplex unit securely into the printer.
Push the duplex unit securely into the printer.

![]()
After finishing installation, you can check whether the duplex unit is properly installed: Print the configuration page from the [List/Test Print] menu. If it is installed properly, you will see "Duplex Unit" for "Attached Equipment" on the configuration page.
If the duplex unit is not installed properly, repeat the procedure from the start. If you cannot install it properly even after reinstallation, contact your sales or service representative.
If the printing position is not correct, adjust the registration of the trays. For more information about adjusting the registration of the trays, see "Adjusting Tray Registration".
When the duplex unit is installed, the rear cover is no longer required. However, we recommend you keep the cover for future use.
Do not install the duplex unit if the paper tray cover is installed.
![]()
"Test Printing", Quick Installation Guide.