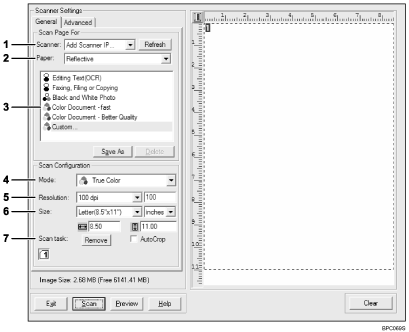
Settings you can configure in the TWAIN dialog box
This section describes the settings in you can configure in the TWAIN dialog box.

Scanner:
Select the scanner you want to use. The scanner you select becomes the default scanner. Click [Refresh] to discover all available scanners connected via USB or the network.
Paper:
Select [Reflective] to scan from the exposure glass, or [Automatic Document Feeder] to scan from the ADF.
Original type
According to your original, select a setting from the list of options detailed below, or select [Custom] to configure your own scan settings.
When using the exposure glass:
[Editing Text (OCR)]
Select this to scan business letters, contracts, memos, or other documents in editable form.
[Faxing, Filing, or Copying]
Select this to scan newspaper and magazine articles, receipts, forms, or other printed text material.
[Black & White Photo]
Select this to scan black and white photographs as grayscale images.
[Color Document - fast]
Select this to scan originals with many graphics, originals with both text and graphics, line art, or color photographs in fast scan mode.
[Color Document - Better Quality]
Select this to scan originals with many graphics, originals with both text and graphics, line art, or color photographs in high-resolution scan mode.
[Custom...]
Select this to configure your own scan settings. You can save or delete your custom scan settings by clicking [Save As] or [Delete], respectively.
When using the ADF:
[ADF-Faster]
Select this to scan originals with many graphics, originals with both text and graphics, line art, or color photographs in fast scan mode.
[ADF-Better]
Select this to scan originals with many graphics, originals with both text and graphics, line art, or color photographs in high-resolution scan mode.
[ADF-gray]
Select this to scan originals with many graphics, originals with both text and graphics, line art, or color photographs as grayscale images.
[Custom...]
Select this to configure your own scan settings. You can save or delete your custom scan settings by clicking [Save As] or [Delete], respectively.
Mode:
Select from color, grayscale, or black-and-white.
Resolution:
Select a resolution from the list. If you select [User defined], enter a resolution value directly in the edit box. Note that increasing the resolution also increases the file size and scanning time.
Selectable resolutions vary depending on where the original is set.
When using the exposure glass:
75, 100, 150, 200, 300, 400, 500, 600, 1200, 2400, 4800, 9600, 19200 dpi, User defined
When using the ADF:
75, 100, 150, 200, 300, 400, 500, 600 dpi, User defined
Size:
Select the scanning size. If you select [User defined], enter the scanning size directly in the edit box. Also, you can change the scanning size with your mouse in the preview area. You can select the unit of measure from [cm], [inches], or [pixels].
Scan task:
Displays a maximum of 10 previously used scan areas. To remove a scan task, select the number of the task, and then click [Remove]. When scanning from the exposure glass, you can select [Auto Crop] to let the scanner automatically detect the size of your original.
![]()
If the scan data is larger than the memory capacity, an error message appears and scanning is canceled. If this happens, specify a lower resolution and scan the original again.

