

  |  | ||
This section explains how to specify a custom size.
To scan a custom size original, measure its width and length, and enter these figures as the Horiz. and Vert. settings.
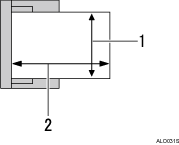
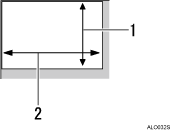
The following figure shows the Horiz. and Vert. of an original.
Placing an original in the ARDF

Vertical
Horizontal
Placing an original on the exposure glass

Vertical
Horizontal
Press [Options].

Press the [![]() ] or [
] or [![]() ] key to select [Scan Size], and then press the [OK] key.
] key to select [Scan Size], and then press the [OK] key.

Press the scroll keys to select [Custom Size], and then press the [OK] key.

Using the number keys, enter the horizontal width, and then press the [OK] key or [![]() ] key.
] key.

Using the number keys, enter the vertical length, and then press the [OK] or [![]() ] key.
] key.

"Programmed" appears, and then the Send Options screen reappears.
Press the [Escape] key.