Printing a Hold Print file
The following procedure describes how to print a Hold Print file with the PCL 6/5e or RPCS printer driver.
![]()
Applications with their own drivers, such as PageMaker, do not support this function.
Sending a Hold Print file
![]() From an application, select a command to print.
From an application, select a command to print.
The [Print] dialog box appears.
![]() Select the printer you want to use in the [Name] list, and then click [Properties].
Select the printer you want to use in the [Name] list, and then click [Properties].
The [Printer Properties] dialog box appears.
![]() In the [Job type:] box, click [Hold Print].
In the [Job type:] box, click [Hold Print].
When printing with the PostScript 3 printer driver, click [Hold Print] in the [Job Type:] box on the [Job Log] tab.
![]() Click [Details...], and then enter a User ID in the [User ID:] box.
Click [Details...], and then enter a User ID in the [User ID:] box.
This is used to identify the user. The user ID can be entered using up to eight alphanumeric (a-z, A-Z, 0-9) characters.
You can also set a file name.
![]() Execute a command to print.
Execute a command to print.
Make sure to set more than two copies.
The Hold Print job is sent to the printer.
Printing a selected Hold Print file only
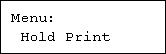
![]() Press the [Menu] key.
Press the [Menu] key.
The [Menu] screen appears.
![]() Press the [
Press the [![]() ] or [
] or [![]() ] to display key [Hold Print], and then press the [
] to display key [Hold Print], and then press the [![]() Enter] key.
Enter] key.
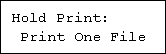
![]() Press the [
Press the [![]() ] or [
] or [![]() ] to display key [Print One File], and then press the [
] to display key [Print One File], and then press the [![]() Enter] key.
Enter] key.
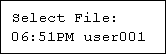
The file name and the time when the job was stored appear.
![]() Press the [
Press the [![]() ] or [
] or [![]() ] key to display the file you want to print, and then press the [
] key to display the file you want to print, and then press the [![]() Enter] key.
Enter] key.
To cancel printing, press the [Escape] key.
![]() Press the [
Press the [![]() Enter] key.
Enter] key.

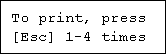
![]() Press [Escape] key 1-4 times.
Press [Escape] key 1-4 times.
The initial screen appears.
Printing all Hold Print files
![]() Press the [Menu] key.
Press the [Menu] key.
The [Menu] screen appears.
![]() Press the [
Press the [![]() ] or [
] or [![]() ] key to display [Hold Print], and then press the [
] key to display [Hold Print], and then press the [![]() Enter] key.
Enter] key.
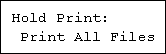
![]() Press the [
Press the [![]() ] or [
] or [![]() ] key to display [Print All Files], and then press the [
] key to display [Print All Files], and then press the [![]() Enter] key.
Enter] key.
The user ID when the job was stored appear.
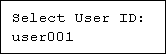
![]() Press the [
Press the [![]() ] or [
] or [![]() ] key to display the user ID for the file you want to print, and then press the [
] key to display the user ID for the file you want to print, and then press the [![]() Enter] key.
Enter] key.
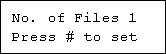
![]() The number of documents selected for printing is displayed. Check the number, and if it is correct, press the [
The number of documents selected for printing is displayed. Check the number, and if it is correct, press the [![]() Enter] key.
Enter] key.
![]() Check the file you want to print is displayed, and then press the [
Check the file you want to print is displayed, and then press the [![]() Enter] key.
Enter] key.
![]() Press the [Escape] key 1-4 times.
Press the [Escape] key 1-4 times.
The initial screen appears.
![]()
When printing is completed, the stored file will be deleted.
To stop printing after printing has started, press the [Job Reset] key. The file will be deleted.
For details about setting printer drivers, see the printer driver Help. You can also print or delete a Hold Print file from Web Image Monitor. For details, see Web Image Monitor Help.