Skip header
ManualsContentsPreviousNextHelp

Envelopes

Printer setup

Make the following settings using the control panel:

  • Press the [Menu] key, select [Paper Input], and then select [Thick Paper] for the selected tray's paper type.

  • Paper type settings made using the printer driver have priority over paper type settings made using the control panel settings.

Printer driver setup

Click [Thick] in the "Paper Type:" list.

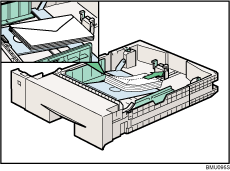
Enabled paper feeding tray

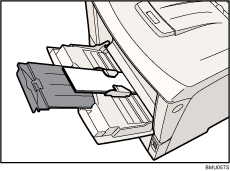
Tray 2 (Envelope Feeder)

Bypass Tray

  • Make sure paper is not stacked higher than the upper limit mark (Down arrow key) inside the tray. Make sure paper is not stacked higher than the paper guides inside the bypass tray.

Both-sided printing

Not possible

Additional cautions

  • Check the print side is facing up.

  • Check there is no air in the envelopes before loading.

  • For better print quality, we recommend the right, left, top, and bottom print margins to be at least 20 mm (0.8") each.

  • Load only one size and type of envelope at a time.

  • Before loading envelopes, flatten their leading edges (the edge going into the printer) by running a pencil or ruler across them.

  • Some kinds of envelope might cause misfeeds, wrinkles or print poorly.

  • Print quality on envelopes may be uneven if parts of an envelope have differing thicknesses. Print one or two envelopes to check print quality.

  • The following can occur when printing on envelopes:

    • creased long edges

    • smudged backs

    • blurred print

    If envelopes are printed over with solid black, white streaks might appear where the envelopes overlap. Using the envelope lever can resolve these problems. For more information about envelope lever, see Using the Envelope Lever.

Note