
| |||
Follow this procedure to set the printer to receive an IP address automatically using DHCP. The DHCP feature is active by default, so this procedure is only required if you have changed the default settings.
![]()
When [DHCP] is selected, you cannot configure settings for the following items:
IPv4 Address
Subnet Mask
Gateway Address
Consult your network administrator for information about making network settings.
Press the [Menu] key.
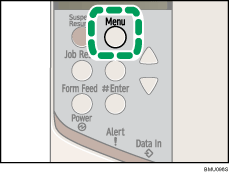
The [Menu] screen appears.
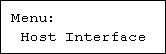
Press the [![]() ] or [
] or [![]() ] key to display [Host Interface], and then press the [
] key to display [Host Interface], and then press the [![]() Enter] key.
Enter] key.
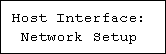
Press the [![]() ] or [
] or [![]() ] key to display [Network Setup], and then press the [
] key to display [Network Setup], and then press the [![]() Enter] key.
Enter] key.
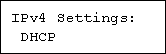
Press the [![]() ] or [
] or [![]() ] key to display [IPv4 Settings], and then press the [
] key to display [IPv4 Settings], and then press the [![]() Enter] key.
Enter] key.

Press the [![]() ] or [
] or [![]() ] key to display [DHCP], and then press the [
] key to display [DHCP], and then press the [![]() Enter] key.
Enter] key.
Press the [![]() ] or [
] or [![]() ] key to select [On] or [Off], and then press the [
] key to select [On] or [Off], and then press the [![]() Enter] key.
Enter] key.
The address will be automatically assigned to the printer.
The default setting is [On].
Press the [Menu] key.
The initial screen appears.
Print a configuration page to confirm the settings made.
![]()
"Printing the Test Page", Quick Installation Guide.
| Copyright (C) 2008 |