
| |||
![]()
Do not touch the inside of the controller board compartment. Doing so may cause a machine malfunction or a burn.
![]()
Before handling the wireless LAN interface board, ground yourself by touching something metal to discharge any static electricity. Static electricity can damage the wireless LAN interface board.
Do not subject the wireless LAN interface unit to physical shocks.
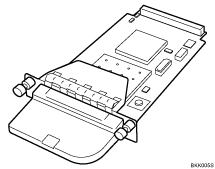
Check the package contains the following:
Wireless LAN Interface Unit
Turn off the power of the printer, and then unplug the power cable and the interface cable.
Remove the two screws and the cover of the wireless LAN interface unit mounting bracket.

The removed cover is not used when installing the wireless LAN interface unit. Keep it for possible future use.
Attach the wireless LAN interface unit.
Insert the end of the wireless LAN interface unit into the slot.

Fasten the wireless LAN interface unit to the controller board with the two screws.
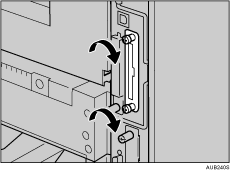
Check the wireless LAN interface unit is connected firmly to be controller board.
![]()
Use a coin or similar object if the screws do not turn easily.
After finishing installation, you can check the wireless LAN interface unit is properly installed: Print the configuration page from the [List/Test Print] menu. If it is installed properly, "IEEE 802.11b" will appear for "Device Connection" on the configuration page.
If the wireless LAN interface unit is not installed properly, reinstall it following this procedure. If you cannot install it properly even after attempting reinstallation, contact your sales or service representative.
You need to make settings with the control panel before using the wireless LAN interface unit. For more information, see "Wireless LAN Configuration".
![]()
"Printing the Test Page", Quick Installation Guide
| Copyright (C) 2008 |