Replacing the Development Unit
![]()
Do not incinerate the development unit. Toner dust might ignite when exposed to an open flame. Dispose of the used development unit in accordance with local regulations.
![]()
Wait at least one hour after power off before replacing parts. Not allowing the printer to cool may result in burns.
The inside of this printer becomes very hot. Do not touch parts labeled "
 " (indicating a hot surface). Touching these parts will result in burns.
![]()
When taking the development unit out of the box, be sure to hold the unit by the handle on the top of the unit. Do not touch any parts of the development unit.
Exposure to light reduces development unit performance. Replace the unit as quickly as possible.
Do not pull out the development unit quickly or with force as it may fall.
Take care that nothing comes into contact with the photo conductor area of the development unit.
Place no objects on the front or inner cover.
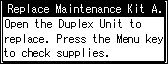
Replace the Maintenance Kit A when the following message appears on the display:
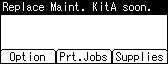
When the following message appears on the display, the Maintenance Kit A should be replaced soon. Prepare a new Maintenance Kit A.
The box contains the following parts. Confirm that the contents of the box match the following lists. Check the contents of the box before replacing Maintenance Kit A.
Maintenance Kit SP 8200 A
Replacement Guide
Leaflet about Unpacking the Development Unit
Development Unit
Disposal Bag
For packing the used development unit
![]() Turn off the printer and unplug the power cord.
Turn off the printer and unplug the power cord.
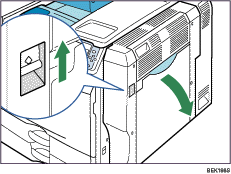
![]() Push up the lever on the right side, and open the printer's right cover carefully.
Push up the lever on the right side, and open the printer's right cover carefully.
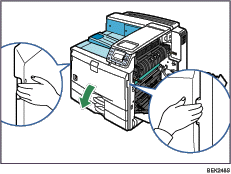
![]() Holding the left and right side grips, carefully open the front cover.
Holding the left and right side grips, carefully open the front cover.
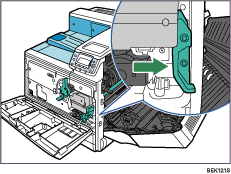
![]() Unlock the right green lever.
Unlock the right green lever.
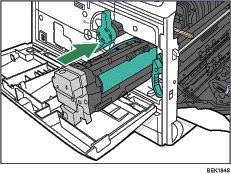
![]() Slide the used development unit out slowly until it stops.
Slide the used development unit out slowly until it stops.
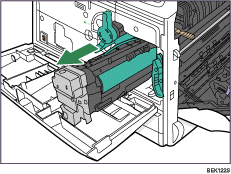
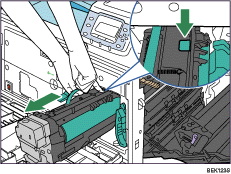
![]() Holding the green handle, push the lock down, and then remove the development unit completely.
Holding the green handle, push the lock down, and then remove the development unit completely.
Put the used development unit on paper or similar material to avoid dirtying your workspace.
Be careful not to tilt or shake the unit. Otherwise, toner might scatter.
![]() Open the box of the new development unit, and then open the plastic bag from the center.
Open the box of the new development unit, and then open the plastic bag from the center.
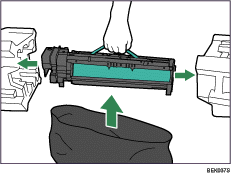
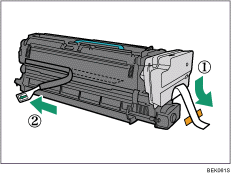
![]() Holding the green handle, lift the development unit out of the box, without removing its protective materials.
Holding the green handle, lift the development unit out of the box, without removing its protective materials.
![]() Holding the green handle, remove the protective materials from both ends, and then take the development unit out of the plastic bag.
Holding the green handle, remove the protective materials from both ends, and then take the development unit out of the plastic bag.
After taking the new development unit from the box, do not to shake or jar the unit.
![]() Remove the desiccant from the development unit.
Remove the desiccant from the development unit.
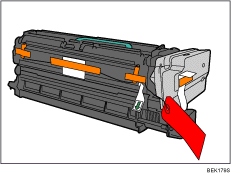
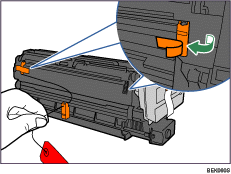
![]() Remove the tapes from both sides, and then take out the fixtures by pulling the wire with a red tag toward you.
Remove the tapes from both sides, and then take out the fixtures by pulling the wire with a red tag toward you.
![]() Remove the tape from the side of the development unit (
Remove the tape from the side of the development unit (![]() ), and then take out the transparent tape (
), and then take out the transparent tape (![]() ).
).
While pulling out the tape, keep the development unit horizontal. Tilting or shaking the unit might cause the toner to scatter.
Do not remove the black sheet until you finish installing the unit. The black sheet is used to protect the photo conductor area of the development unit.
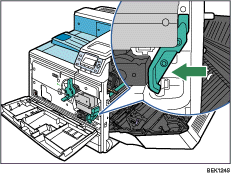
![]() Slide the development unit into the printer completely.
Slide the development unit into the printer completely.
![]() Lock the right green lever back in place.
Lock the right green lever back in place.
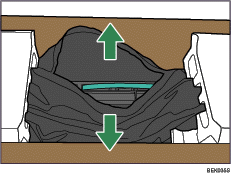
![]() At the right side of the printer, remove the tape on the left and right sides of the black sheet, and then pull out the sheet using both hands.
At the right side of the printer, remove the tape on the left and right sides of the black sheet, and then pull out the sheet using both hands.

Do not touch the photo conductor area protected by the black sheet.
![]() Carefully close the front cover.
Carefully close the front cover.
![]() Carefully close the right cover.
Carefully close the right cover.
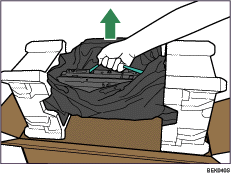
![]() Put the old development unit into the disposal bag.
Put the old development unit into the disposal bag.
![]() Turn on the printer.
Turn on the printer.
“Please wait.” appears on the display, and the printer starts calibration. Wait until it stops. Calibration takes four to five minutes. Do not turn off the power during calibration. Doing so results in a malfunction.
![]()
Confirm that the “Replace Maintenance Kit A.” message on the display has cleared. Replacing the Maintenance Kit A is finished.