Vertical White Streak Roller Marks
When duplex printing of halftone images is performed, roller marks may appear as vertical white streaks on Side 1.
This is prone to occur when textured media is used.
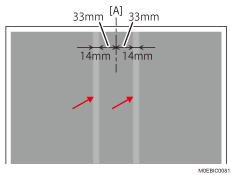
[A] Center of the paper
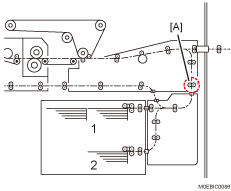
Cause:
This is caused by the main relay roller.
When duplex printing is performed, the nip of the main relay roller 1 [A] becomes separated when shifting for horizontal registration on Side 2. During that, the drive roller (circled in blue in the figure) stops rotating at the position protruding on the paper guide’s side, resulting in Side 1 of the paper coming into contact with the drive roller and creating roller marks as vertical white streaks.
Solution:
 If the paper is not registered as custom paper, register the brand of the paper.
 In [Detailed settings] for custom paper, select 1232: [Fusing Temperature] and increase the temperature setting for the fusing heat roller by 5°C according to the color mode you wish to use.
1232-01: Fusing Temperature: BW/FC/FCS: Heat Roller Temp
1232-06: Fusing Temperature: FCS: Heat Roller Temp: Clear/Special
1232-07: Fusing Temperature: FCS: Heat Roller Temp: White
1232-08: Fusing Temperature: FCS: Heat Roller Temp: Metallic
1232-26: Fusing Temperature: S: Heat Roller Temp: Clear/Special
1232-27: Fusing Temperature: S: Heat Roller Temp: White
1232-28: Fusing Temperature: S: Heat Roller Temp: Metallic
1232-46: Fusing Temperature: BW/FC/FCS: Fuser Setting HQ: Heat Roller Temp
1232-51: Fusing Temperature: FCS: Fuser Setting HQ: Heat Roller Temp: Clear/Special
1232-52: Fusing Temperature: FCS: Fuser Setting HQ: Heat Roller Temp: White
1232-53: Fusing Temperature: FCS: Fuser Setting HQ: Heat Roller Temp: Metallic
1232-71: Fusing Temperature: S: Fuser Setting HQ: Heat Roller Temp: Clear/Special
1232-72: Fusing Temperature: S: Fuser Setting HQ: Heat Roller Temp: White
1232-73: Fusing Temperature: S: Fuser Setting HQ: Heat Roller Temp: Metallic
 Print the image. Has the problem been resolved?
Yes | Go to the next step. |
No | Repeat Steps 2 and 3. If the print result exceeds the acceptable range even after increasing the fusing heat roller temperature to 185°C (at the "High" or "Middle" print speed) or 200°C (at the "Low" print speed), there is no other solution. |
 Is the paper curled?
 Check if the curl is within the acceptable range.
Yes | Finished! |
No | Go to the next step. |
 In [Detailed settings] for custom paper, select 1321: [Correct Paper Curl], and then specify [Correction Mode].
To correct curls facing up, specify "U Curl Correction Level: Large" or "U Curl Correction Level: Small".
To correct curls facing down, specify "П Curl Correction Level: Large" or "П Curl Correction Level: Small".
 Print the image. Has the problem been resolved?
Yes | Finished! |
No | Repeat Steps 6 and 7. If the problem persists, there is no other solution. |

Select "Clear/Special" when using Neon Yellow, Neon Pink, or Invisible Red. Select "Metallic" when using Gold or Silver.