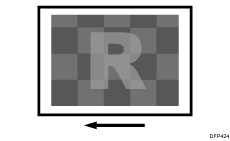
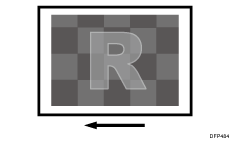
White Spots (Unprinted: Around Clear-toner Images)
Colorless spots appear around clear-toner images.
Normal
Unprinted
Cause:
Uneven density occurs due to overlaying a special color (clear) on a CMYK toner image. Due to this uneven density, some toner fails to be transferred during paper transfer from the intermediate transfer belt [B] to the paper [A], resulting in white spots.
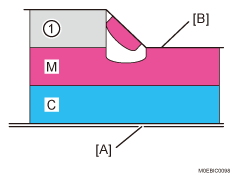
Clear
Occurrence conditions:
When printing in FCS mode or FCS mode with higher priority to image quality
When there is a CMYK toner image around a special toner (clear) image (blue is especially prone to white spots)
When printing on slippery paper
Solution:
 In the [Machine: Maintenance] group on the [Operator Adjust.], check 0514: [Temperature/Humidity Outside].
If the temperature is 10°C or above, or the humidity is 15% or above, go to the next step.
Otherwise, perform the procedure from Step 6.
 Are you using Paper Weight 4 (105.1 g/m2 or higher)?
Otherwise, perform the procedure from Step 6.
 In [Detailed settings] for the custom paper you are using, set 1218: [Paper Transfer Output] to [Textured Paper].
Select 1231: [Print Speed], and then set the value in the following corresponding settings to [Low].
1231-01: Print Speed: BW/FC/FCS: BW/FC/FCS
1231-02: Print Speed: FCS: Clear/Special
1231-03: Print Speed: FCS: White
1231-04: Print Speed: FCS: Metallic
1231-06: Print Speed: S: Clear/Special
1231-07: Print Speed: S: White
1231-08: Print Speed: S: Metallic
1231-10: Print Speed: BW/FC/FCS: Fuser Setting HQ: BW/FC/FCS
1231-11: Print Speed: FCS: Fuser Setting HQ: Clear/Special
1231-12: Print Speed: FCS: Fuser Setting HQ: White
1231-13: Print Speed: FCS: Fuser Setting HQ: Metallic
1231-15: Print Speed: S: Fuser Setting HQ: Clear/Special
1231-16: Print Speed: S: Fuser Setting HQ: White
1231-17: Print Speed: S: Fuser Setting HQ: Metallic
 Print the image. Did the image quality deteriorate?
Yes | Change [Output Mode] to [Normal] in 1218: [Paper Transfer Output], restore the previous setting in 1231: [Print Speed], and then go to Step 6. |
No | Go to the next step. |
 Has the problem of fainter prints been resolved?
Yes | Finished! |
No | Go to the next step. |
 In the [Machine: Maintenance] group on the [Operator Adjust.] menu, select 0506: [Execute Developer Refreshing], and then execute 02: [Black].
 Print the image. Has the problem been resolved?
Yes | Finished! |
No | Contact your service representative. |
 Execute Toner Refreshing.
Then print 30 sheets of solid-fill images with 100% density for each color of CMYK.
If the problem persists or is not reduced, there is no other solution.

Select "Clear/Special" when using Neon Yellow, Neon Pink, or Invisible Red. Select "Metallic" when using Gold or Silver.
After performing the solution, it is recommended to perform the color calibration of the external printer controller.