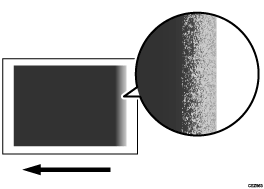
Faint Color at the Trailing Edge of the Paper (White Spots)
The trailing edge is fainter.
Cause:
This problem may occur due to insufficient transfer current or excessive paper transfer when thick paper of approximately 160 gsm or higher thickness is used in a low temperature and low humidity environment.
Solution:
 Measure the length (in mm) of the area from the trailing edge of the paper where the print is faint.
 If the paper is not registered as custom paper, register the brand of the paper.
 In [Detailed settings] for the custom paper you are using, select 1216: [Paper Transfer Output Correction: Paper Edge], and then adjust the values in the following settings to "area where the print is faint + 10 mm" according to the mode in use.
1216-05: Paper Transfer Output Correction: Paper Edge: BW: Trailing Edge Length
1216-10: Paper Transfer Output Correction: Paper Edge: FC/FCS: Trailing Edge Length
1216-27: Paper Transfer Output Correction: Paper Edge: S: Trailing Edge Length: Clear/Special
1216-28: Paper Transfer Output Correction: Paper Edge: S: Trailing Edge Length: White
1216-29: Paper Transfer Output Correction: Paper Edge: S: Trailing Edge Length: Metallic
 Select 1216: [Paper Transfer Output Correction: Paper Edge].
1216-03: Paper Transfer Output Correction: Paper Edge: BW: Trailing Edge
1216-08: Paper Transfer Output Correction: Paper Edge: FC/FCS: Trailing Edge
1216-19: Paper Transfer Output Correction: Paper Edge: S: Trailing Edge: Clear/Special
1216-20: Paper Transfer Output Correction: Paper Edge: S: Trailing Edge: White
1216-21: Paper Transfer Output Correction: Paper Edge: S: Trailing Edge: Metallic
Print images with the following two settings.
Setting 1: Present value +1
Setting 2: Present value -1
 Check to see if the white spots have disappeared.
If the white spots have disappeared with either Setting 1 (present value +1) or Setting 2 (present value -1), this procedure is complete.
If the white spots have not disappeared but reduced, go to the next step.
 If improvement is observed by Setting 1 (increasing the value by one step), increase the value by one more step. If improvement is observed by Setting 2 (decreasing the value by one step), decrease the value by one more step.
 Print the image and check to see if the white spots have disappeared.
Yes | Finished! |
No | Repeat Steps 6. If the problem persists or is not reduced, there is no other solution. |

Select "Clear/Special" when using Neon Yellow, Neon Pink, or Invisible Red. Select "Metallic" when using Gold or Silver.