Hazing on the Sides / Arched Glossy Streaks
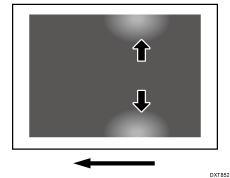
Hazing on the Sides
Voids appear on the left and right of the paper.
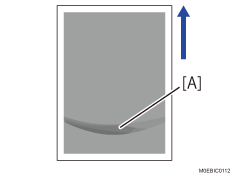
Arched Glossy Streaks
Arched glossy streaks (A) appear at the trailing edge of the paper.
Cause:
Hazing on the sides of the paper is caused by toner blasting due to contact with unfused images in the paper path.
Arched glossy streaks appear due to contact with unfused images in the paper path, causing partial fluctuation to the gloss.
Solution:
(a) Voids appear on the first 8 sheets of A3 paper during initial feeding
 In the [Machine: Maintenance] group on the [Operator Adjust.] menu, execute 0512-01: [Fuser Unit Speed Adjustment].
(b) If the problem occurs from the start to the end of printing / If the problem occurs prominently on side 1 during duplex printing
For coated paper size A3 or larger of weight 4 or lower, or non-coated paper of size A3 or larger of weight 1, set the paper direction to be horizontal relative to the feed direction.
 If the problem persists, select [Speed Adjustment] in 1341 [Motor Speed] in [Detailed settings] for custom paper, and then increase the line speed in steps of 0.5% according to the paper length.
1341-04: Motor Speed: Speed Adjustment: Fusing Belt: Paper Length: Less than 487.8 mm
You can increase the value up to +1.0%.

Do not set the value to +1.5% or above.
If set to +1.5% or above, the paper may be pulled by the paper transfer, causing image stretching.
 (For paper with a paper length of 487.8 mm or more) If the problem persists, select [Speed Adjustment] in 1341 [Motor Speed] in [Detailed settings] for custom paper, and then decrease the line speed in steps of -0.5% according to the paper length.
1341-05: Motor Speed: Speed Adjustment: Fusing Belt: Paper Length: 487.8 - 700.0 mm
1341-06: Motor Speed: Speed Adjustment: Fusing Belt: Paper Length: More than 700.0 mm
You can decrease the value up to -1.5%.
For banner sheets, the fusing belt speed adjustment setting is set to "-0.5%" as the default. Decrease the value additionally from "-0.5%".

After performing the solution, it is recommended to perform the color calibration of the external controller.