Toner Blasting (Lines)
Toner blasting occurs to part of line images.
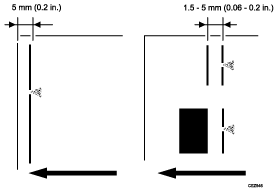
This may occur in a line that is 5 mm (0.2 inches) or less from the leading edge, or in a line that is 1.5 to 5 mm (0.06 to 0.2 inches) from an image on the side of the image facing the trailing edge.
Cause:
A high amount of toner is prone to adhere to line images, causing toner blasting. This is especially prone to occur on slippery paper such as coated paper.
Solution:
 If the paper is not registered as custom paper, register the brand of the paper.
 In [Detailed settings] for the custom paper you are using, select 1212: [Image Transfer Output], and then check the present value in the following corresponding settings.
1212-01: Image Transfer Output: BW: Black
1212-02: Image Transfer Output: FC/FCS: Black
1212-03: Image Transfer Output: FC/FCS: Cyan
1212-04: Image Transfer Output: FC/FCS: Magenta
1212-05: Image Transfer Output: FC/FCS: Yellow
1212-06: Image Transfer Output: FC/FCS: Clear/Special
1212-07: Image Transfer Output: FC/FCS: White
1212-08: Image Transfer Output: FC/FCS: Metallic
If the value is set to below "10" | Go to the next step. |
If the value is set to "10" (upper limit) | Proceed to Step 4. |
 Does any of the following problems occur?
Drum imprint
A black image is faint.
Edge of an image is faint.
Yes | Proceed to Step 7. |
No | Proceed to Step 8. |
 Increase the value for intermediate (image) transfer output by one step.
 Print the image. Has the problem been resolved?
Yes | Go to the next step. |
No | Start over from Step 2. |
 Does any of the following problems occur?
Drum imprint
A black image is faint.
Edge of an image is faint.
Yes
Go to the next step.
No
Finished!
 Adjust the value for the intermediate (image) transfer output until the side effect is no longer noticeable.
 Select 1341: [Motor Speed], and then increase the value of 01: [Transfer Timing Roller] by 0.1%.

If toner blasting occurs within 90 mm (3.5 inches) of the leading edge of the paper, skip this step and go to Step 10.
 Print the image. Has the problem been resolved?
Yes | Go to the next step. |
No | Start over from Step 8. |
 Does any of the following problems occur?
Hazing
Banding
Yes | Go to the next step. |
No | Finished! |
 Decrease the value of [Transfer Timing Roller] in 1341: [Motor Speed] until the problem is sufficiently reduced.
 Select 1201: [Max Image Density], and then decrease the value in 01: [Black].
 Print the image. Has the problem been resolved?
Yes | Finished! |
No | Start over from Step 11. If the problem persists even after decreasing the value to the lower limit, there is no other solution. Apply the best setting among those with which you have printed. |
Select "Clear/Special" when using Neon Yellow, Neon Pink, or Invisible Red. Select "Metallic" when using Gold or Silver.
If toner blasting occurs to the lines at the leading edge of the paper.
You can reduce it by increasing the margin at the leading edge of the paper.
Custom Paper Settings
1239-01: Margin: BW/FC/FCS/S: Leading Edge
1239-03: Margin: FCS: Leading Edge: Clear/Special
1239-04: Margin: FCS: Leading Edge: White
1239-05: Margin: FCS: Leading Edge: Metallic
By increasing the value, the image moves in the direction to increase the leading edge margin (and decrease the trailing edge margin).