Installing the LAN-Fax Driver
To use LAN-Fax on the machine connected to your computer, install the LAN-Fax driver and specify the settings of the original to send by LAN-Fax and optional settings.
You can import the address book of the machine to the LAN-Fax driver by using LAN-Fax Generic Utilities that is installed to the computer along with the driver.

-
Manage Printers permission is required to install the drivers. Log on as an Administrators group member.
-
In an IPv6 environment, you cannot use the Standard TCP/IP port.

-
If the "User Account Control" dialog box appears in driver installation procedure, click [Yes] or [Continue].
-
If the "Windows Security" dialog box appears in driver installation procedure, click [Install this driver software anyway].
-
Download the latest LAN-Fax driver from the manufacturer's website.
-
Double-click the downloaded file.
-
If the "Security Warning" screen is displayed, click [OK].
-
If the "User Account Control" screen is displayed, click [Yes] or [Allow].
-
-
On the "End User License Agreement" screen, click [Agree and Go to Next].
-
Select [Network], and then click [Next].

The search for the devices connected to the network starts.If the machine cannot be found
The "Network Connection Error" screen is displayed.
Confirm and proceed to
 to
 , and then click [OK]. If the machine is still not detected, click [Click if you cannot find the device] and select the installation method.
-
Specify device IP address:
-
Click [Next].
-
Enter the IP address of the machine and click [Search].
-
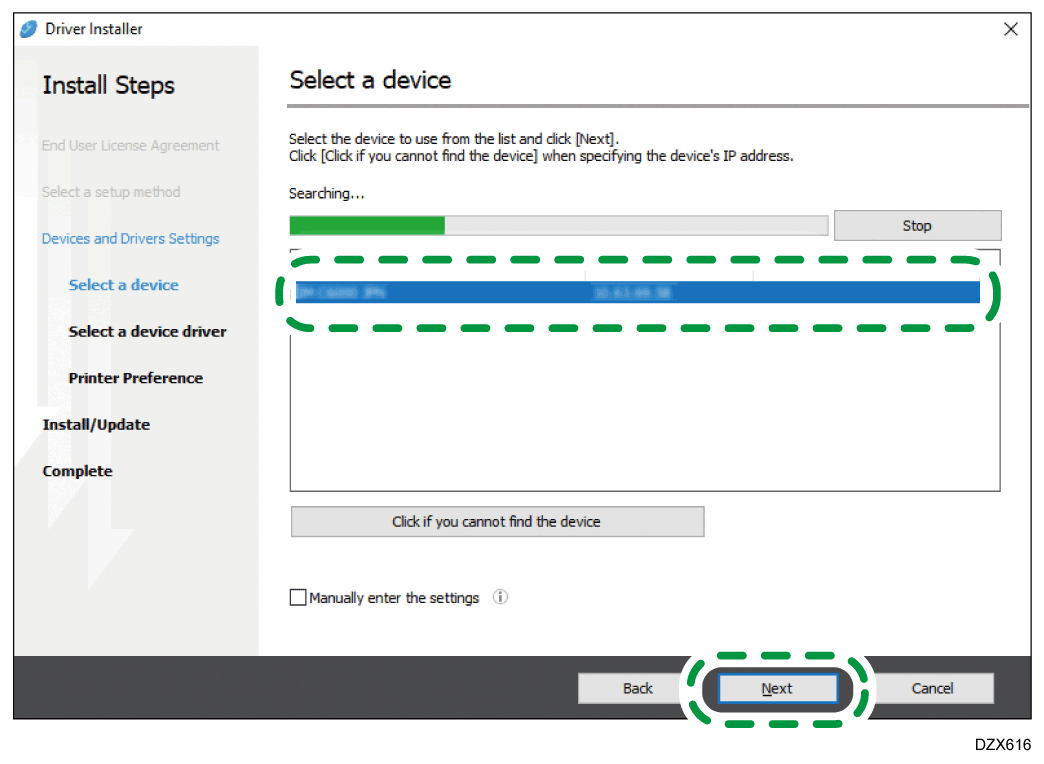
Select the machine from among the detected devices, and then click [Next].
-
Proceed to Step 8.
-
-
Manually enter settings:
-
Click [Next].
-
Proceed to Step 6.
-
-
-
Select the machine from among the detected devices, and then click [Next].
Proceed to Step 7. -
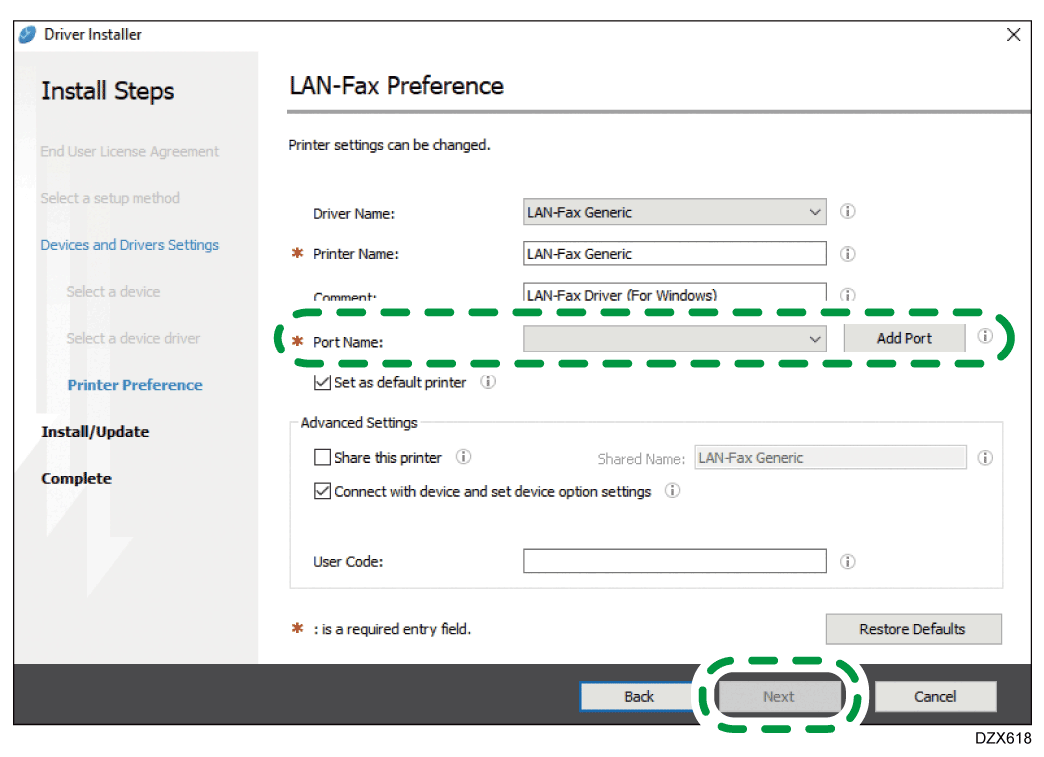
On the "LAN-Fax Preference" screen, specify the port.
-
Specify the same port with the printer driver of the machine on the "Port Name", or click [Add Port] and add a new port.
-
-
Click [Next].
LAN-Fax driver installation starts. -
When prompted to select whether to install Device Software Manager, select whether to install Device Software Manager.
To install Device Software Manager select the [Install Device Software Manager] check box, and then click [Next]. Follow the instructions on the screen to install Device Software Manager.
To not install Device Software Manager clear the [Install Device Software Manager] check box, and then click [Next]. -
When the installation is completed, click [Finish].
After installing the driver, check that the options installed on the machine have been reflected to the driver correctly. Change the option settings or specify the destinations as necessary.
-
Manage Printers permission is required to set the properties for the LAN-Fax Driver. Log on as an Administrators group member.
-
The method for selecting the LAN-Fax Driver will vary according to your operating system. For details, see Windows Help.
-
Display the "Devices and Printers" screen.
Windows 11
-
On the [Start] menu, click [All apps]
 [Windows Tools] [Control Panel].
-
Click [View devices and printers].
Windows 10 (version 1703 or later), Windows Server 2019/2022
-
On the [Start] menu, click [Windows System]
 [Control Panel].
-
Click [View devices and printers].
Windows 10 (before version 1703), Windows Server 2016
-
Right-click [Start], and then click [Control Panel].
-
Click [View devices and printers].
Windows 8.1, Windows Server 2012/2012 R2
-
On the Charm Bar, click [Settings]
[Control Panel]. -
Click [View devices and printers].
-
-
Right-click the LAN-FAX icon, and then click [Printer properties].
-
On the "Accessories" tab, check that the options installed on the machine are selected, and then click [OK].
-
When the machine is connected to the computer in the network, the machine imports the option settings automatically. If the option settings of the machine are not reflected, click [Update Now].
-
Set the items other than the option settings, use of Email or confirmation of the addresses for example, as necessary.
-
-
If the options on this machine are not configured as instructed, LAN-Fax functions may fail.
-
If this machine is connected to a network, configuration of each option installed on the machine will be performed automatically. If the settings do not match the installed optional units, click [Update Now].
You can simplify the procedure to specify the settings when sending a LAN-Fax by specifying the original size and the resolution to send the data in advance.
-
Display the "Devices and Printers" screen.
Windows 11
-
On the [Start] menu, click [All apps]
[Windows Tools] [Control Panel]. -
Click [View devices and printers].
Windows 10 (version 1703 or later), Windows Server 2019/2022
-
On the [Start] menu, click [Windows System]
[Control Panel]. -
Click [View devices and printers].
Windows 10 (before version 1703), Windows Server 2016
-
Right-click [Start], and then click [Control Panel].
-
Click [View devices and printers].
Windows 8.1, Windows Server 2012/2012 R2
-
On the Charm Bar, click [Settings]
[Control Panel]. -
Click [View devices and printers].
-
-
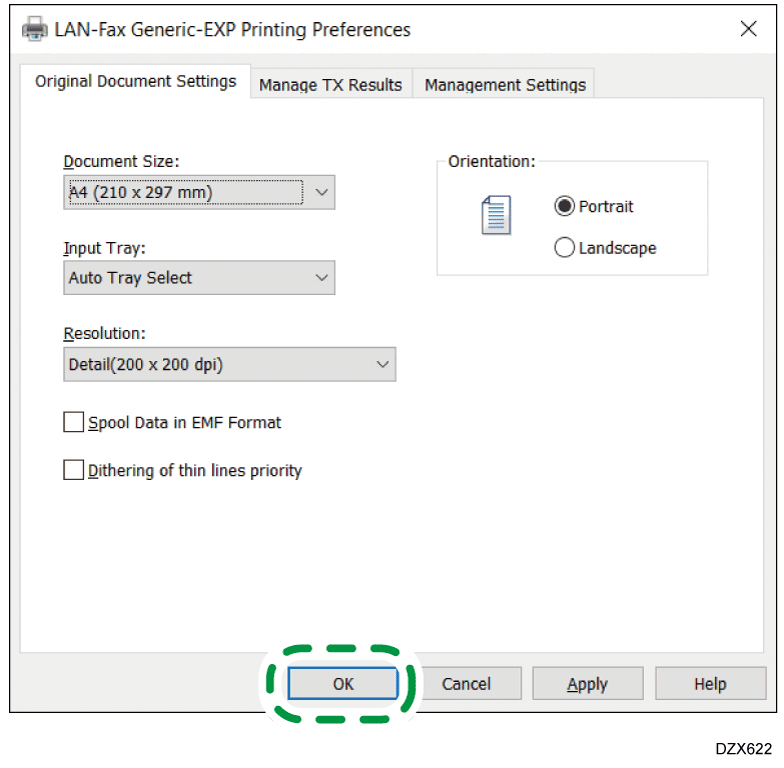
Right-click the LAN-FAX icon, and then click [Printing preferences].
-
Specify the original size, resolution, and other settings, and then click [OK].
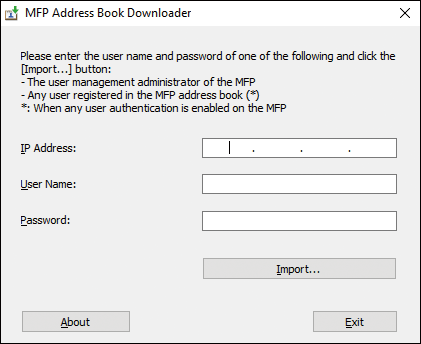
Use "MFP Address Book Downloader" and "Address Book" in "LAN-Fax Generic Utilities" to import the address book registered to the machine into the "Address list" of the LAN-Fax driver.
Install the device certificate before using "MFP Address Book Downloader".
For details, see Encrypting Network Communication.
-
To import destinations from the machine directly without editing, perform the procedure "Importing destinations into the LAN-Fax driver".
To save the CSV file and convert it to an RFA file
On the application menu of the computer, click [MFP Address Book Downloader] on [LAN-Fax Generic Utilities].
Specify the IP address of the machine and login information, and then click [Import].
Enter the file name, specify the location to save the file, and then click [Save].
The CSV file is saved.Click [Exit] to quit [MFP Address Book Downloader].
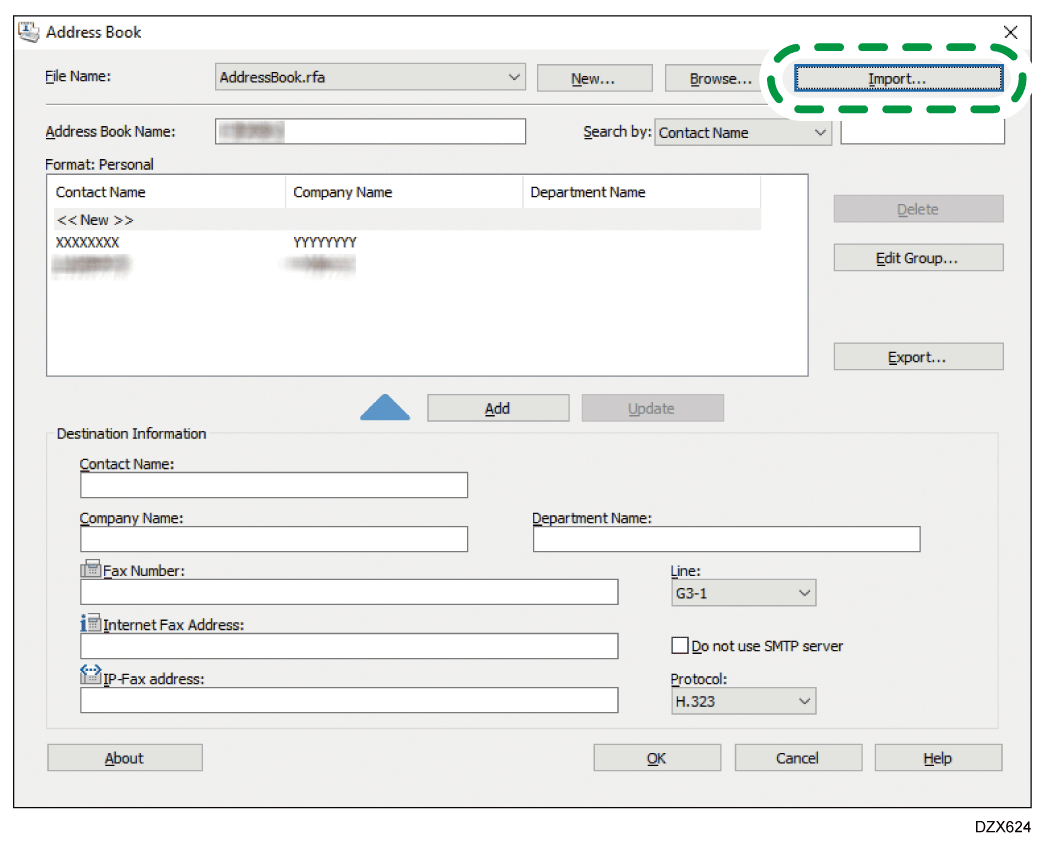
Convert the CSV file to an RFA file using [Address Book].On the application menu of the computer, click [Address Book] on [LAN-Fax Generic Utilities].
On the "Address Book" screen, click [Import].
Select the saved CSV file in "MFP Address Book Downloader", select the RFA CSV file (*.csv) in the file format list, and then click [Open].
Confirm the location to save the file, enter the file name, and then click [Save].
The RFA file is saved.
If "Do you want to use the device address preferentially?" is displayed, click [No].
On the "Address Book" screen, enter the name of the address book in [Address Book Name], and then click [OK]
The MFP address book import tool ends.
The "Address list name" is displayed in the address book list of the LAN-Fax driver.

Importing destinations into the LAN-Fax driver
Display the "Devices and Printers" screen.
Windows 11
On the [Start] menu, click [All apps]
Click [View devices and printers].
Windows 10 (version 1703 or later), Windows Server 2019/2022
On the [Start] menu, click [Windows System]
Click [View devices and printers].
Windows 10 (before version 1703), Windows Server 2016
Right-click [Start], and then click [Control Panel].
Click [View devices and printers].
Windows 8.1, Windows Server 2012/2012 R2
On the Charm Bar, click [Settings]
Click [View devices and printers].
Right-click the LAN-FAX icon, and then click [Printer properties].
Click [Print Test Page].
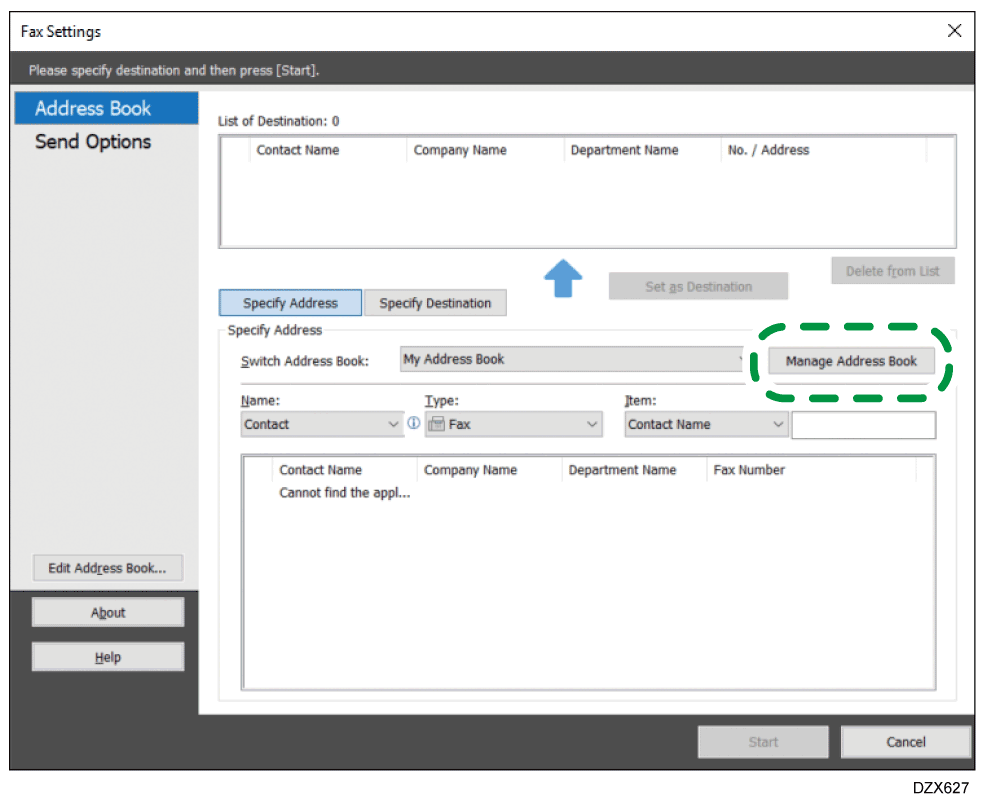
The "Fax Settings" screen is displayed.Click [Manage Address Book].
Specify the location to import the address book information.
- Download Device Address Book: Imports the destinations from the address book on the machine directly. Enter the user name and password of the machine, and then click [Import]. After completing the importing process, click [Finish].
- Add: Imports the destinations from the RFA file. Select a file format and the file to import, and then click [Open].
Click [OK].
Select the imported address book on "Switch Address Book" to check that the imported destinations are displayed.
Click [Cancel] to close the setting screen.